How to Create an Event in Kamero
An event is one gallery: one wedding, one school function, one party. Guests open it with the event ID, a link or a QR code and find their photos. This guide covers the My Events list, the create form, and the event page you use after the event is created.
Before you start
Every event takes its photo limit from one of these:
- An event pack. You buy packs on Home. Each pack creates one event and sets how many photos it can hold.
- A subscription. Events come out of your plan's yearly upload limit. A subscription event has no photo limit or expiry date of its own: it uses the shared limit and stays online while the subscription is active. Space you set aside for guest uploads is taken from the same limit. See Subscription plans and buying and How the subscription upload limit works.
Not sure which to buy? See Event pack or subscription.
If you have neither, buy a pack first. On Home, scroll to Purchase Event Pack. Click Add to Cart next to the size you want and then Buy Now. Tick Use Credits to pay from your wallet (1 credit = ₹1). If your credits cover the whole amount, the button reads Add Packs. Bought packs appear under My Event Packs as Unused until you create an event with them.
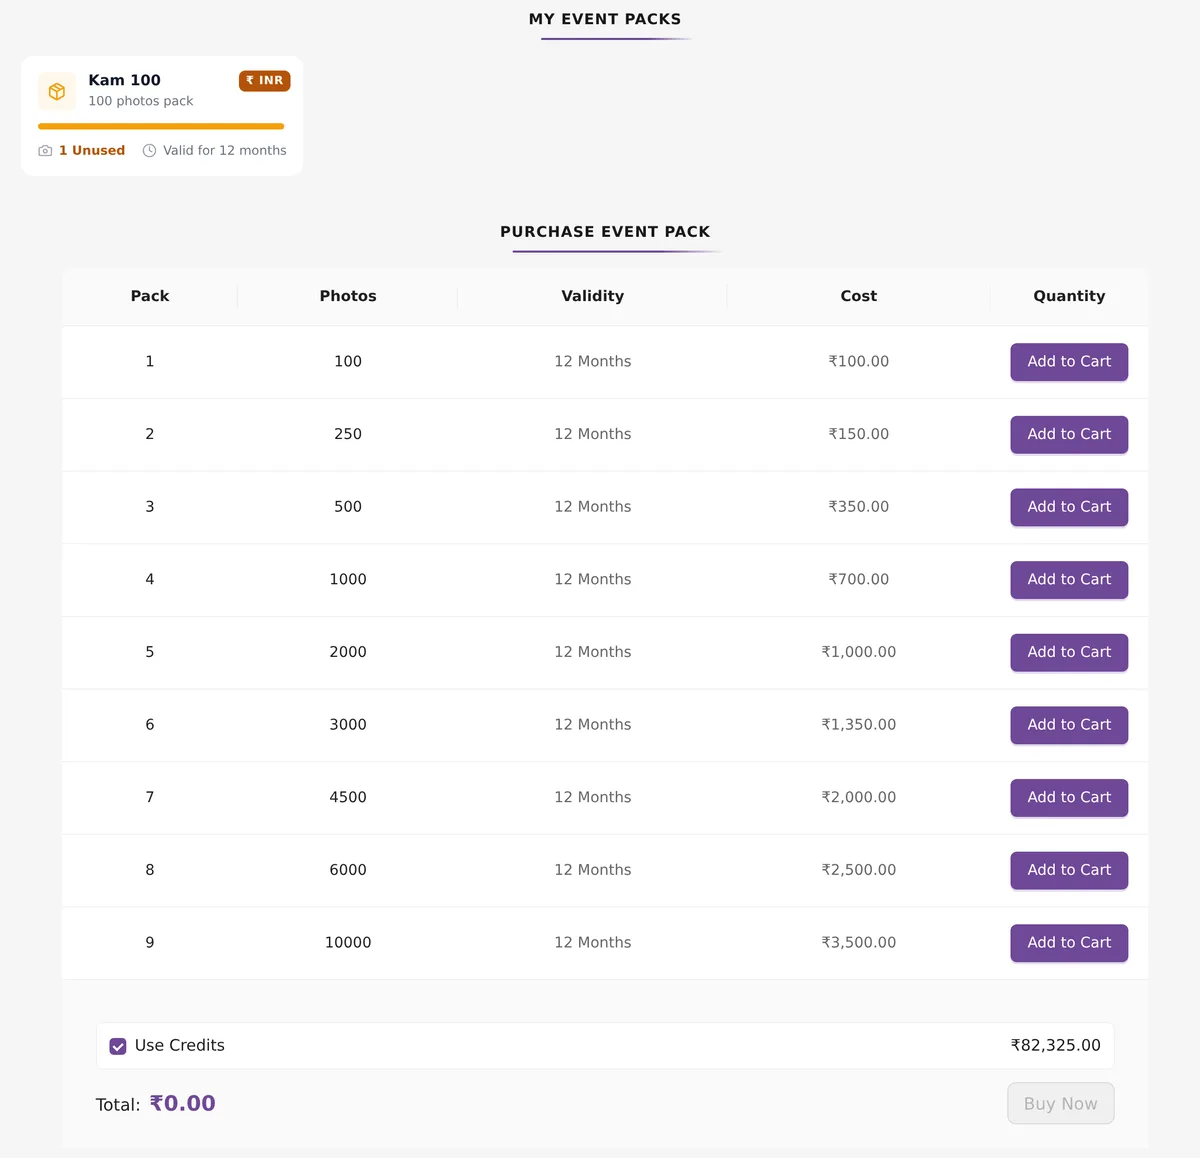
Pack prices in India (GST of 18% is added at checkout):
- 100 photos: ₹100
- 250 photos: ₹150
- 500 photos: ₹350
- 1,000 photos: ₹700
- 2,000 photos: ₹1,000
- 3,000 photos: ₹1,350
- 4,500 photos: ₹2,000
- 6,000 photos: ₹2,500
- 10,000 photos: ₹3,500
Outside India, packs are priced in US dollars, from $5 for 100 photos to $180 for 10,000. Pick a size with room to spare. A photo uploaded as Original counts as 2, and you can add photos later if you run out.
The My Events list
Click Events in the top bar. Every event you have made is here as a card, newest first, 12 to a page.
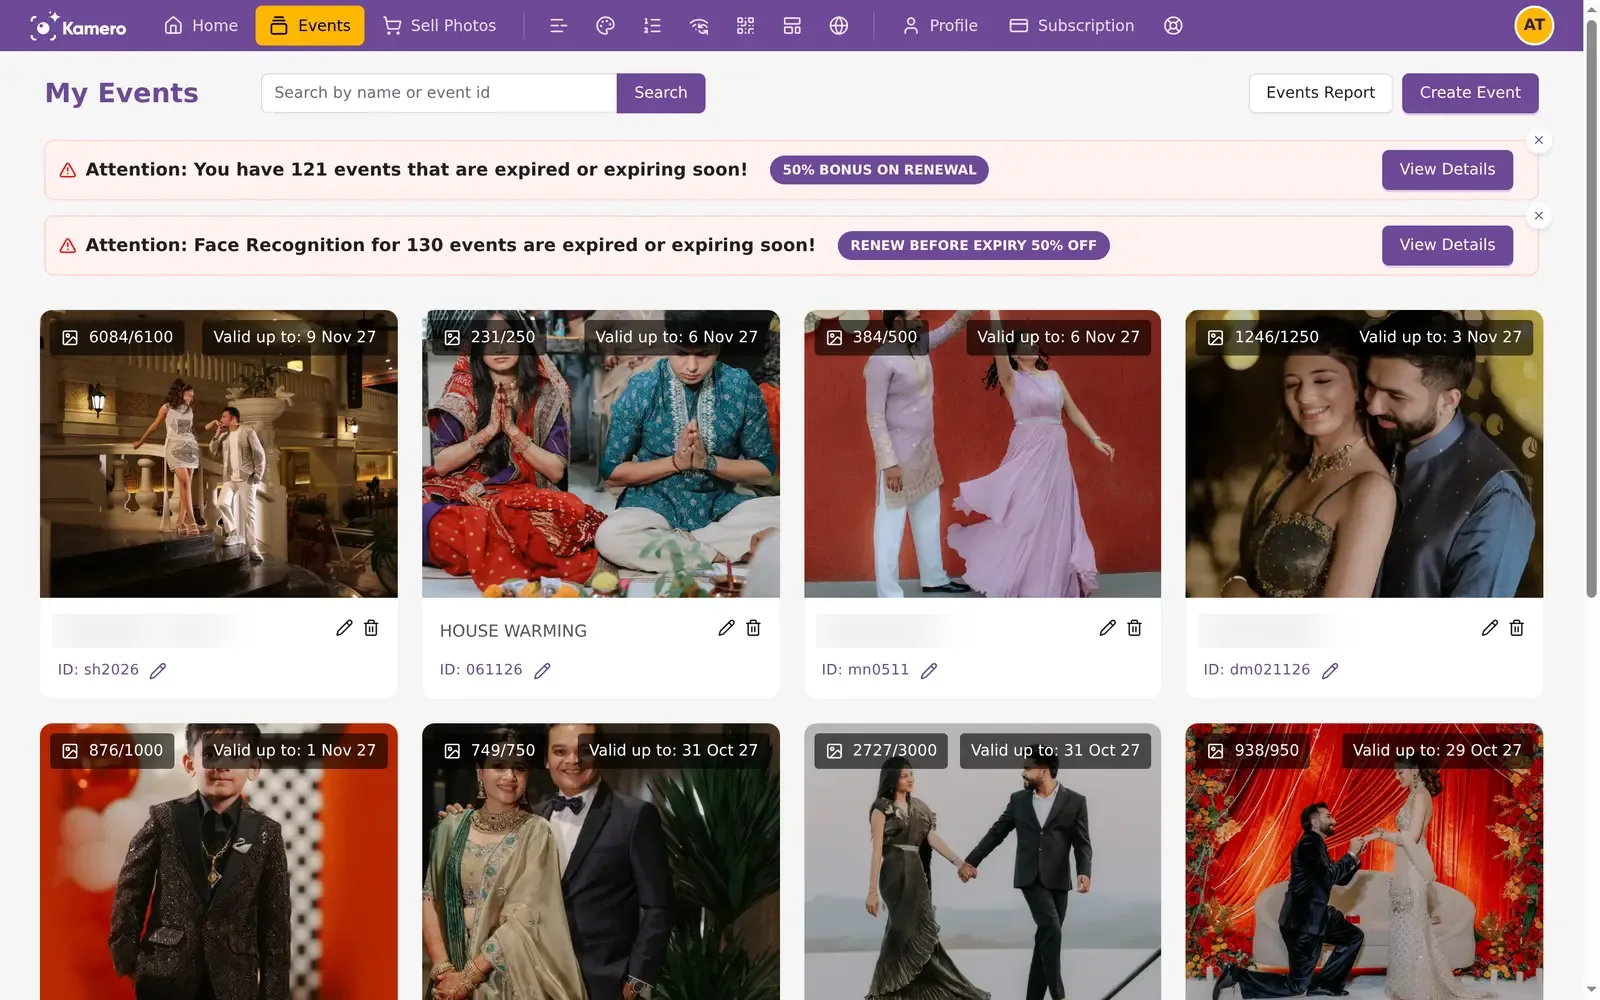
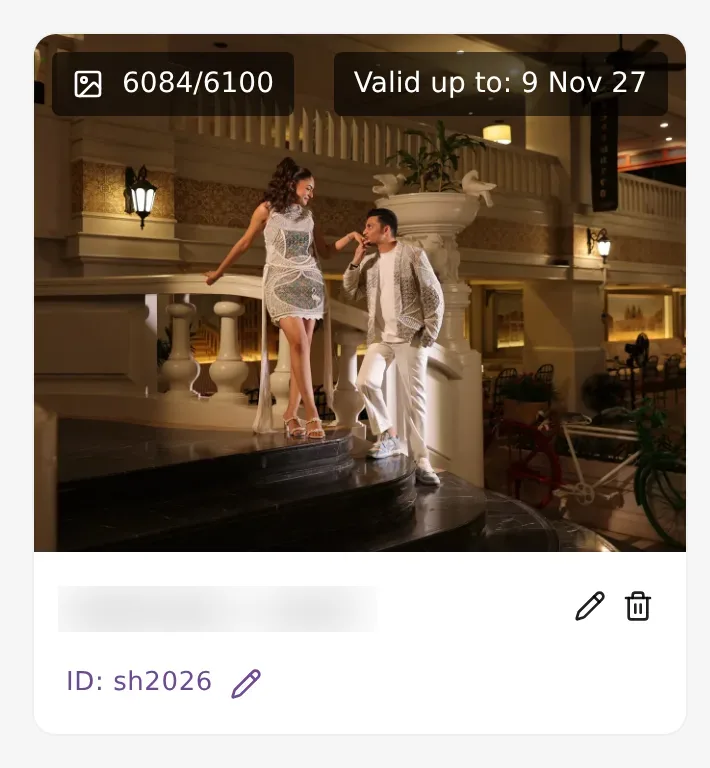
Each card shows:
- The cover photo.
- Photos used out of the limit, for example 6084/6100.
- Valid up to, the date the event expires.
- The event name, with a pencil to rename it and a bin to delete it.
- The event ID, with its own pencil to change it.
Search
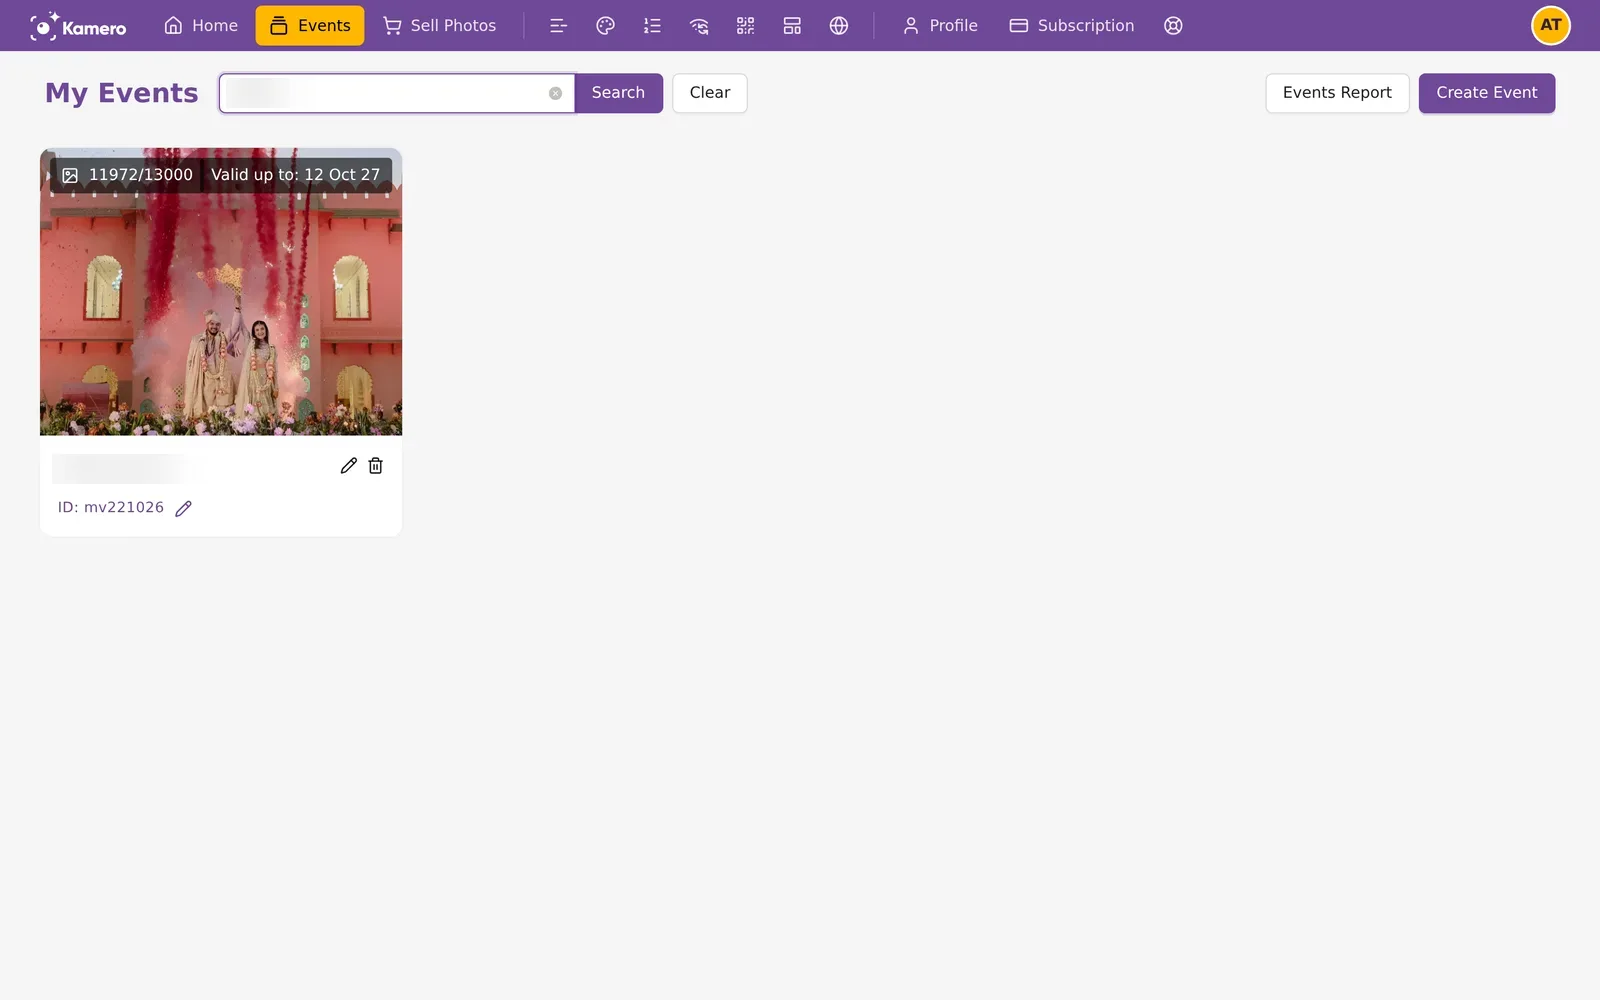
Type part of an event name or an event ID in Search by name or event id and press Enter or click Search. Click Clear to see every event again. The list has no status filters, so search is the quickest way to find one event.
Change the event ID
The event ID is the short code guests type in the Kamero app. Click the pencil next to ID on a card to change it. Use letters and numbers only, plus @ or -, with no spaces. Keep it short and easy to say out loud.
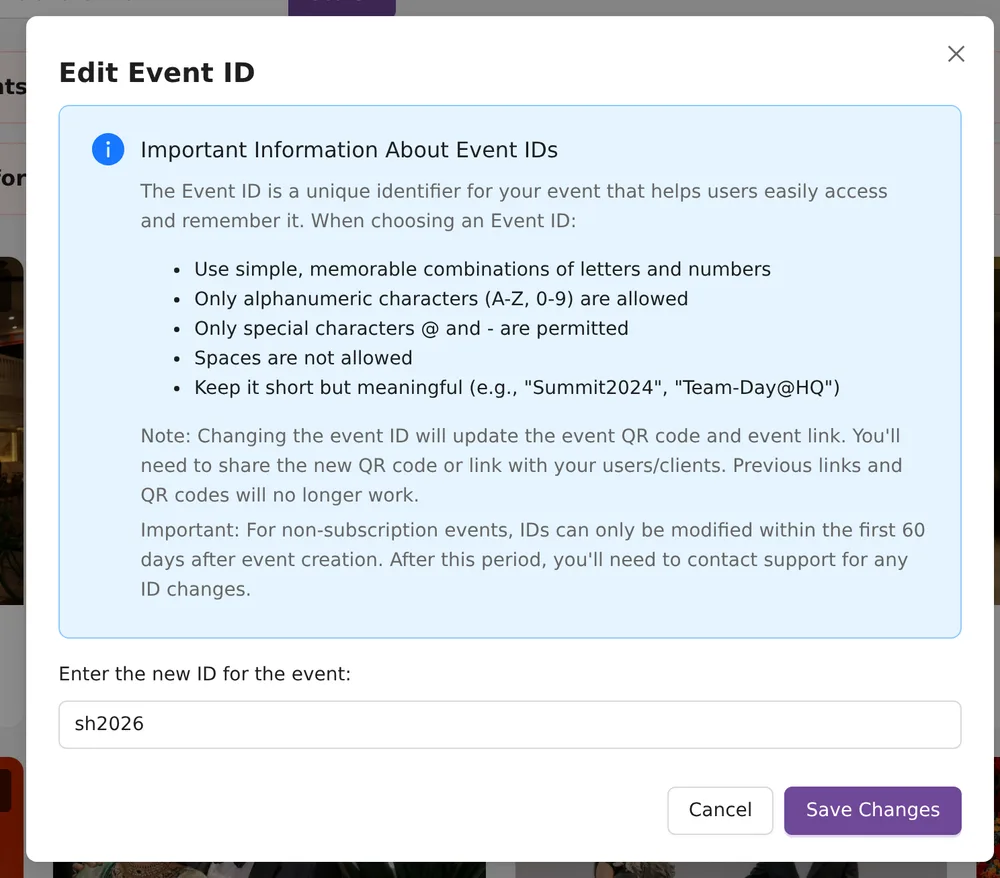
The old link and QR code stop working after the change, so share the new ones. For pack events you can change the ID only in the first 60 days.
Expiring and expired events
A red banner appears when events are expired or expire within 30 days. A second banner does the same for face recognition. Click View Details to see a table of those events with a Renew button and a Share Renewal Link button for each.
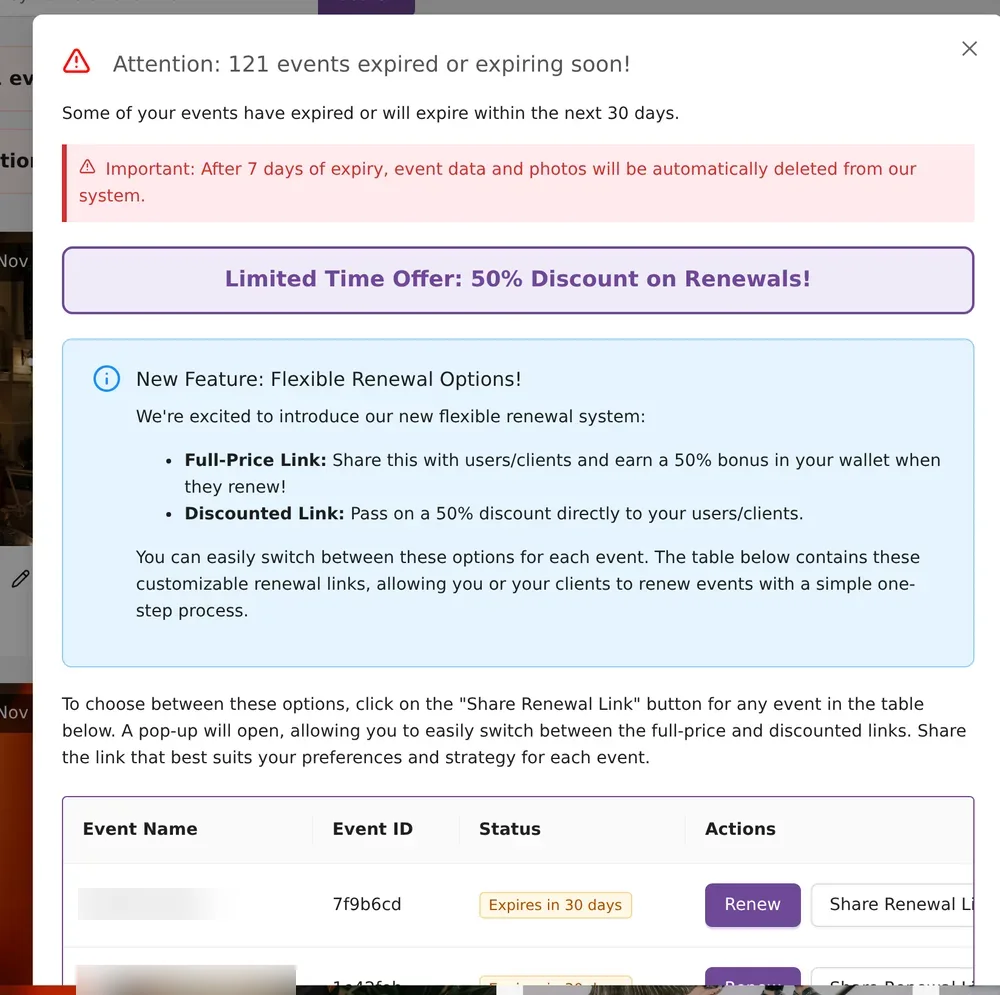
A renewal link lets your client pay for the renewal. There are two kinds:
- Full-Price Link: the client pays full price and you get a 50% bonus in your wallet.
- Discounted Link: the client gets the 50% discount instead.
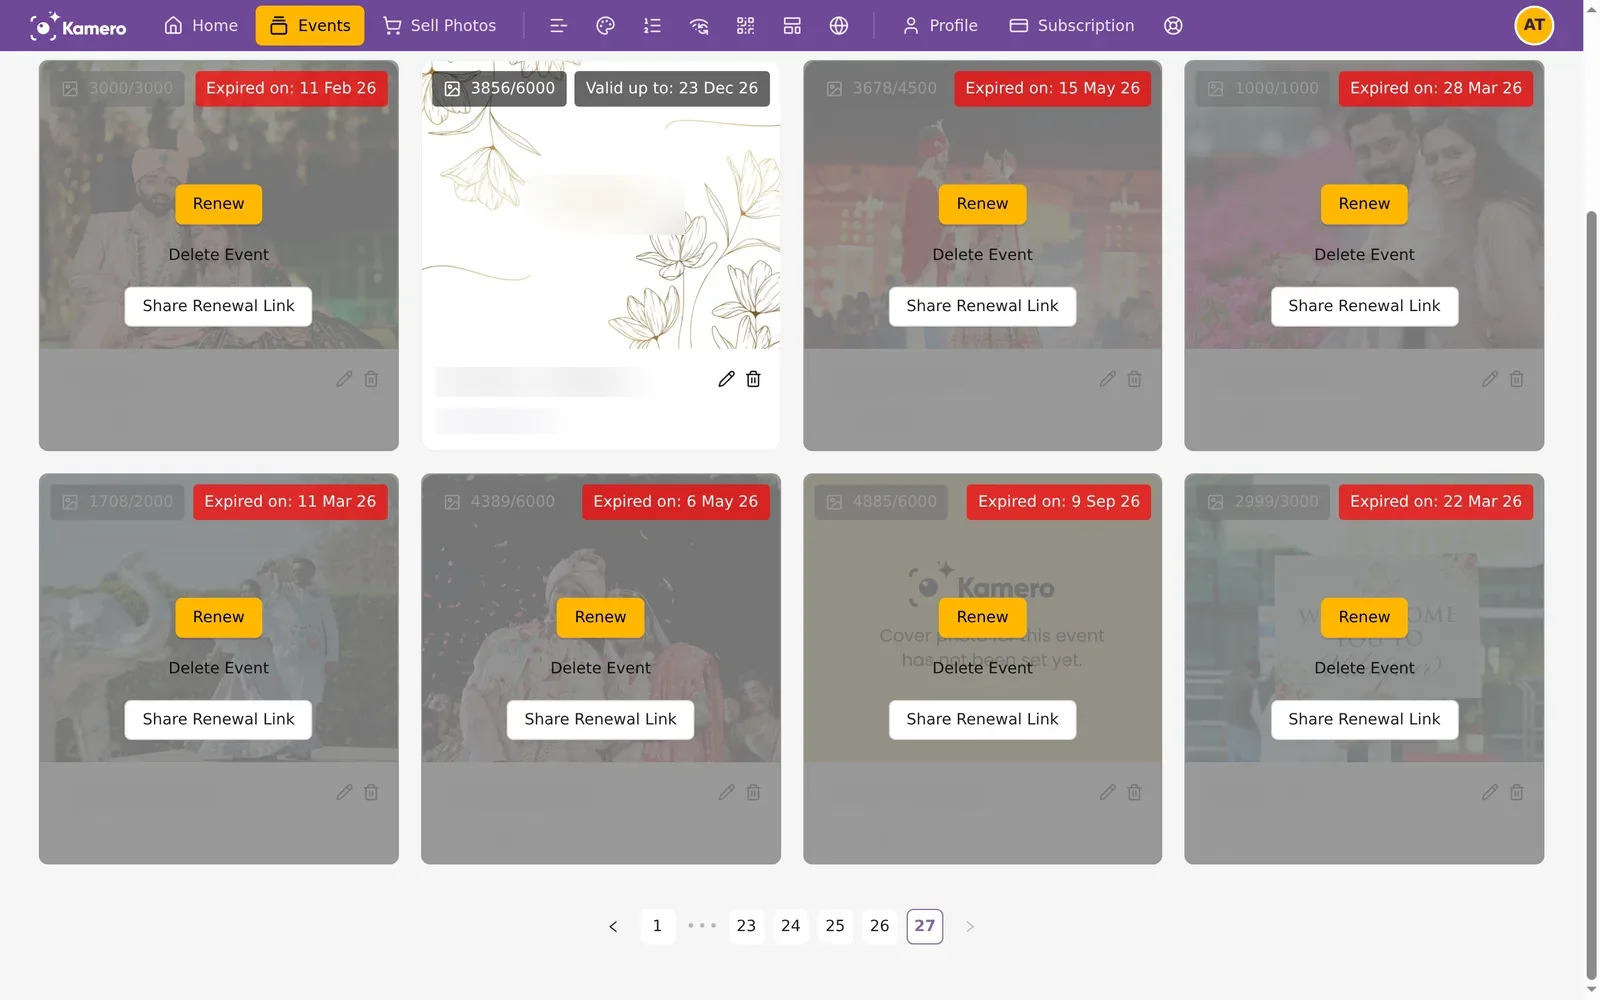
Expired events stay in the list with Expired on and the date. Kamero may archive (remove) an event 7 days after it expires; renew before then to be safe. An expired subscription event shows Renew Subscription instead of Renew, because you renew the subscription, not the event. More in Event validity and expiry.
Create the event
1. Choose where the photos come from
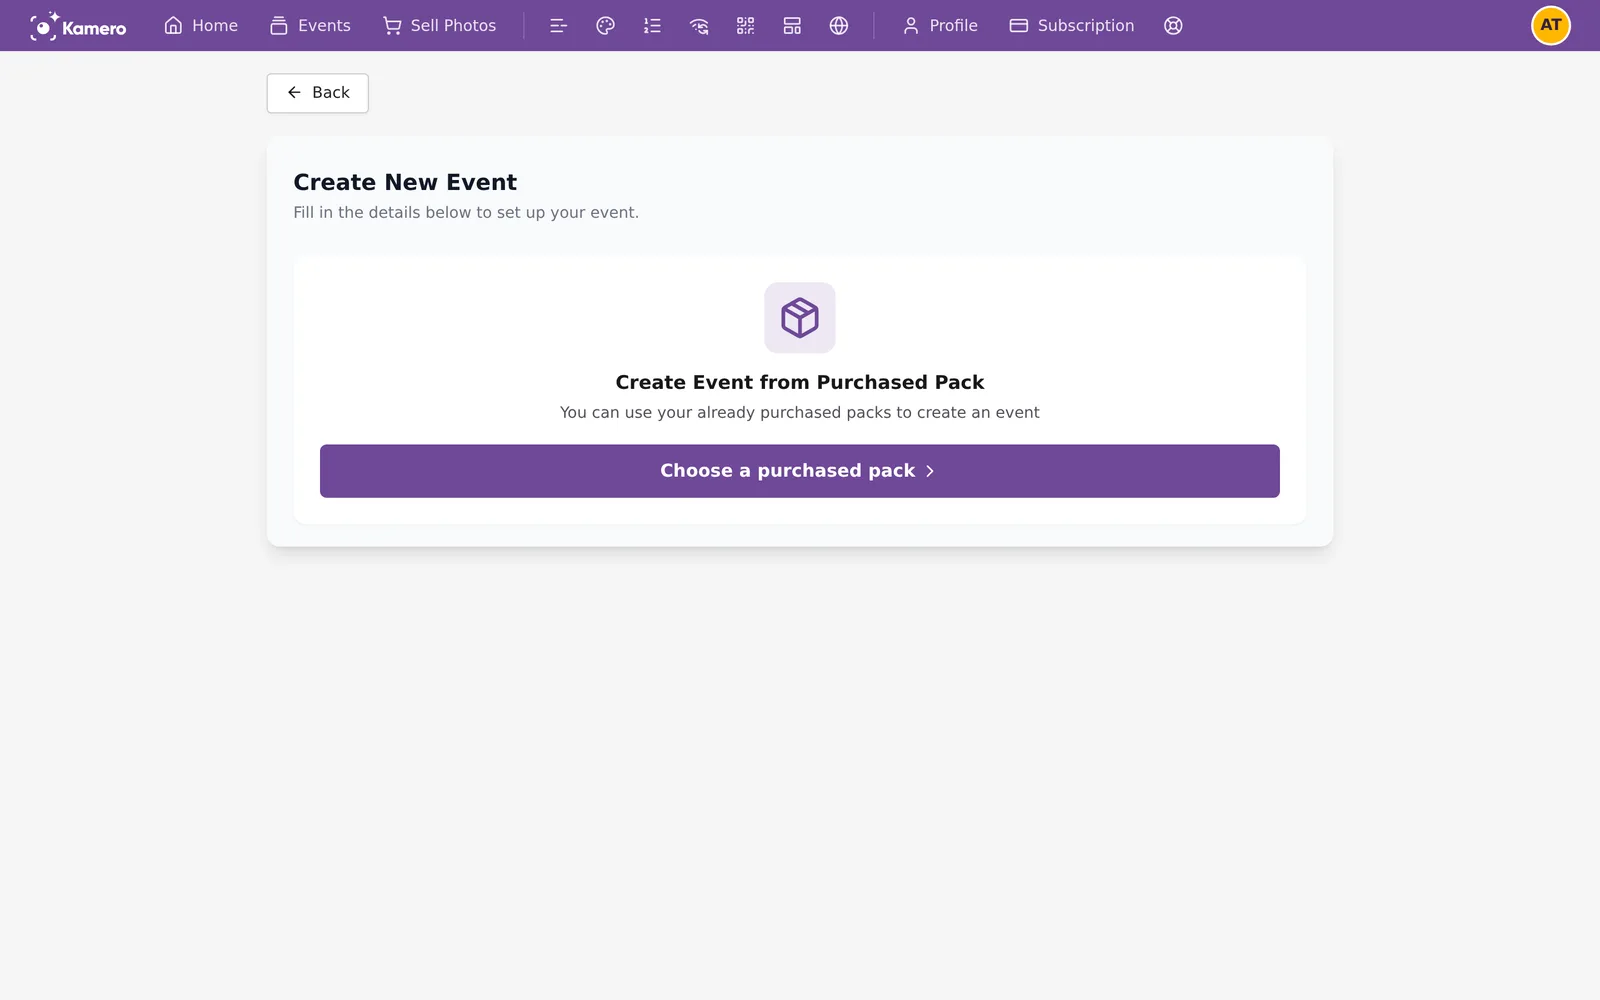
On My Events, click Create Event. You see one card for each way you can pay:
- Create Event from Subscription, with the button Use my subscription. It appears only if you have a subscription.
- Create Event from Purchased Pack, with the button Choose a purchased pack.
2. Pick a pack
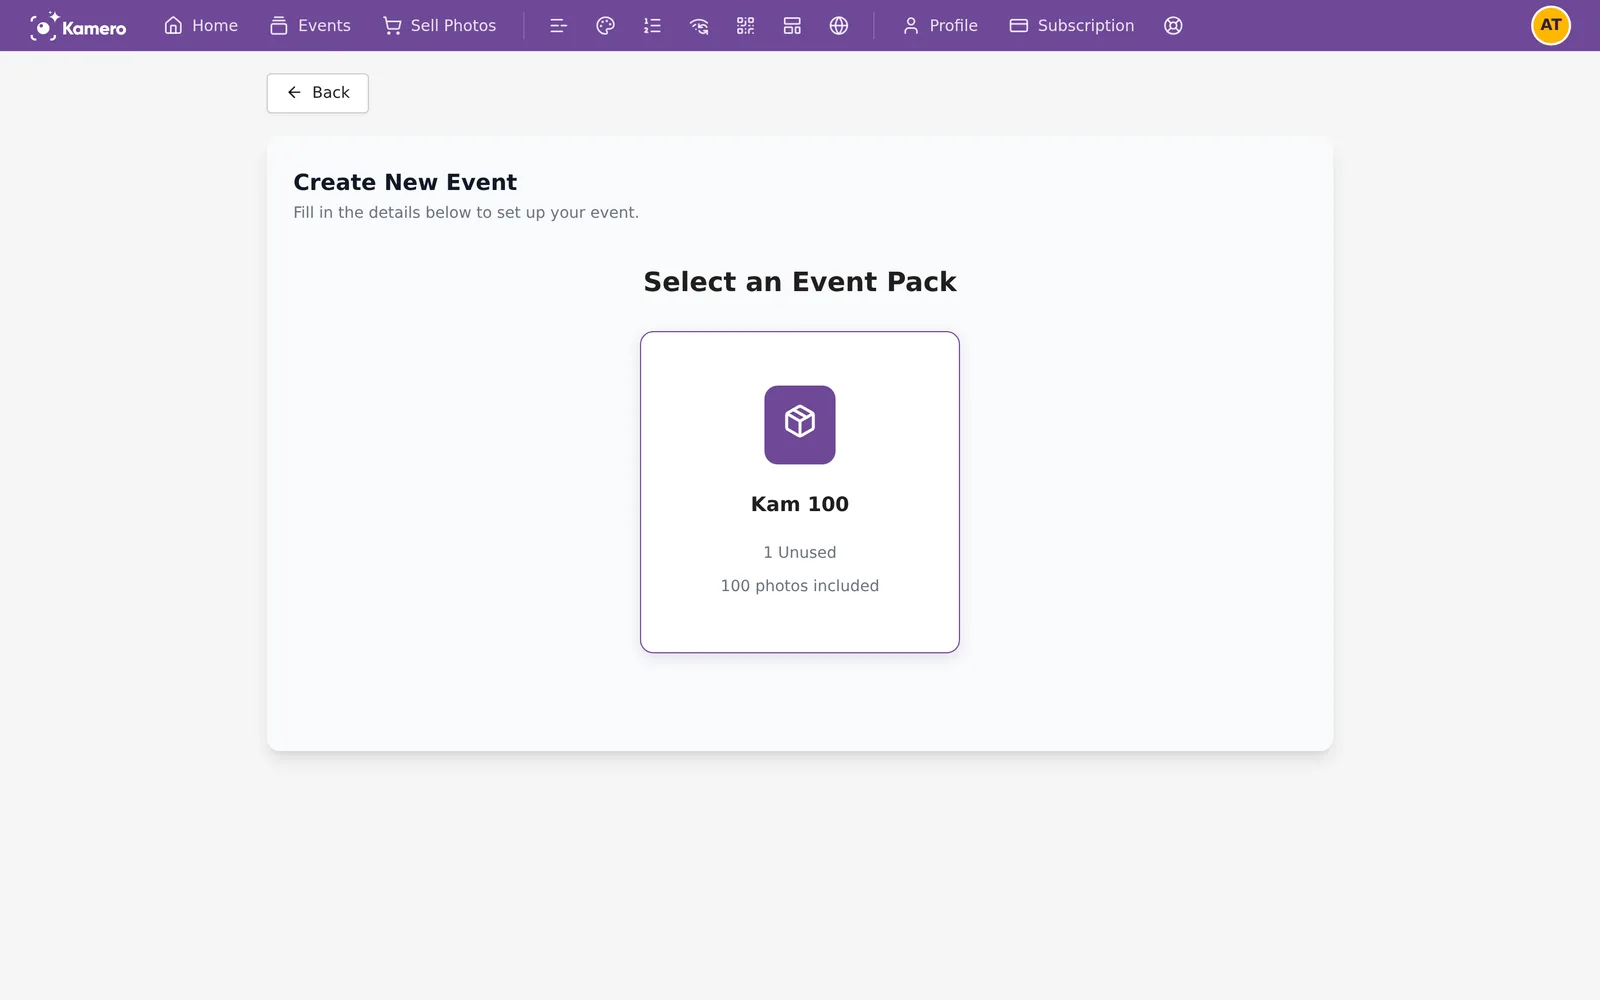
The next screen lists your unused packs, for example Kam 100, 1 Unused, 100 photos included. Click the pack to use. If you have none, the page says No Event Packs Available and offers Go to Dashboard to Purchase Pack.
3. Fill in the form
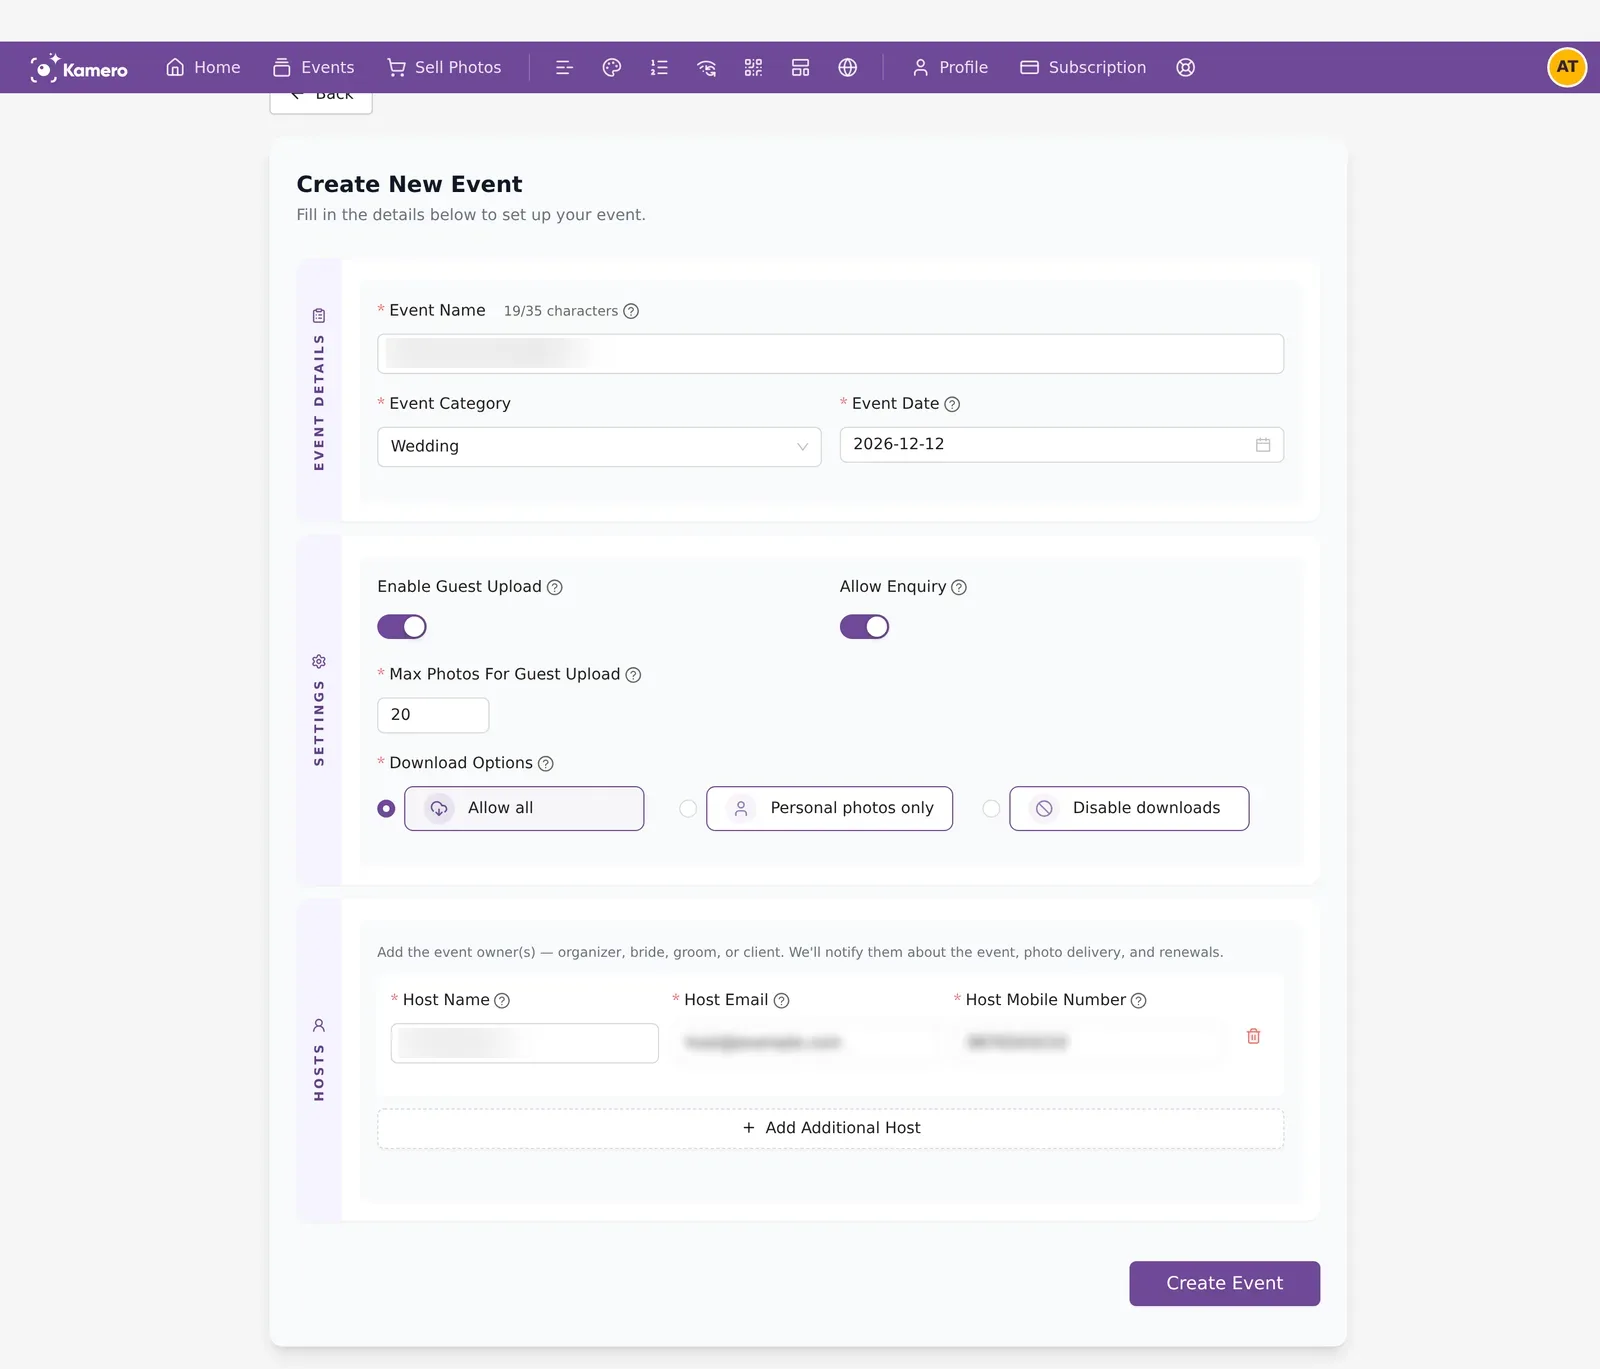
Event Details
- Event Name. The name guests see. Up to 35 characters. A counter shows how many you have used.
- Event Category. 20 choices, such as Wedding, Engagement, Birthday, Corporate and Sporting Event. Pick the closest, or Other.
- Event Date. The day of the event. It is shown to guests and does not change how long the event stays online.
Settings
- Enable Guest Upload. Lets guests add their own photos from the Kamero app. Turn it on and set Max Photos For Guest Upload, the most each guest can add. It cannot be more than the pack's photos.
- Allow Enquiry. On by default. Guests can contact you about your services, which gives you leads.
- Download Options. Allow all lets guests download any photo. Personal photos only lets them download only the photos they appear in. Disable downloads turns downloads off.
Hosts
The host is your client, usually the couple, the family or the school. Enter the Host Name, Host Email and Host Mobile Number. The host gets notifications and Photo Selection by email. For numbers outside India, start with + and the country code. Click Add Additional Host to add up to 5 hosts.
4. Create
Click Create Event. There is no separate confirm screen. The pack is used and the new event appears at the top of My Events.
The form has no fields for these, so here is where they are set:
- Validity comes from the pack: 12 months from the day you create the event.
- Standard or Original quality is chosen each time you upload. See Upload photos from the web dashboard.
- Face recognition is bought separately on the event page, as shown below.
The event page
Click an event card to open its page. This is where you upload, organise and share.
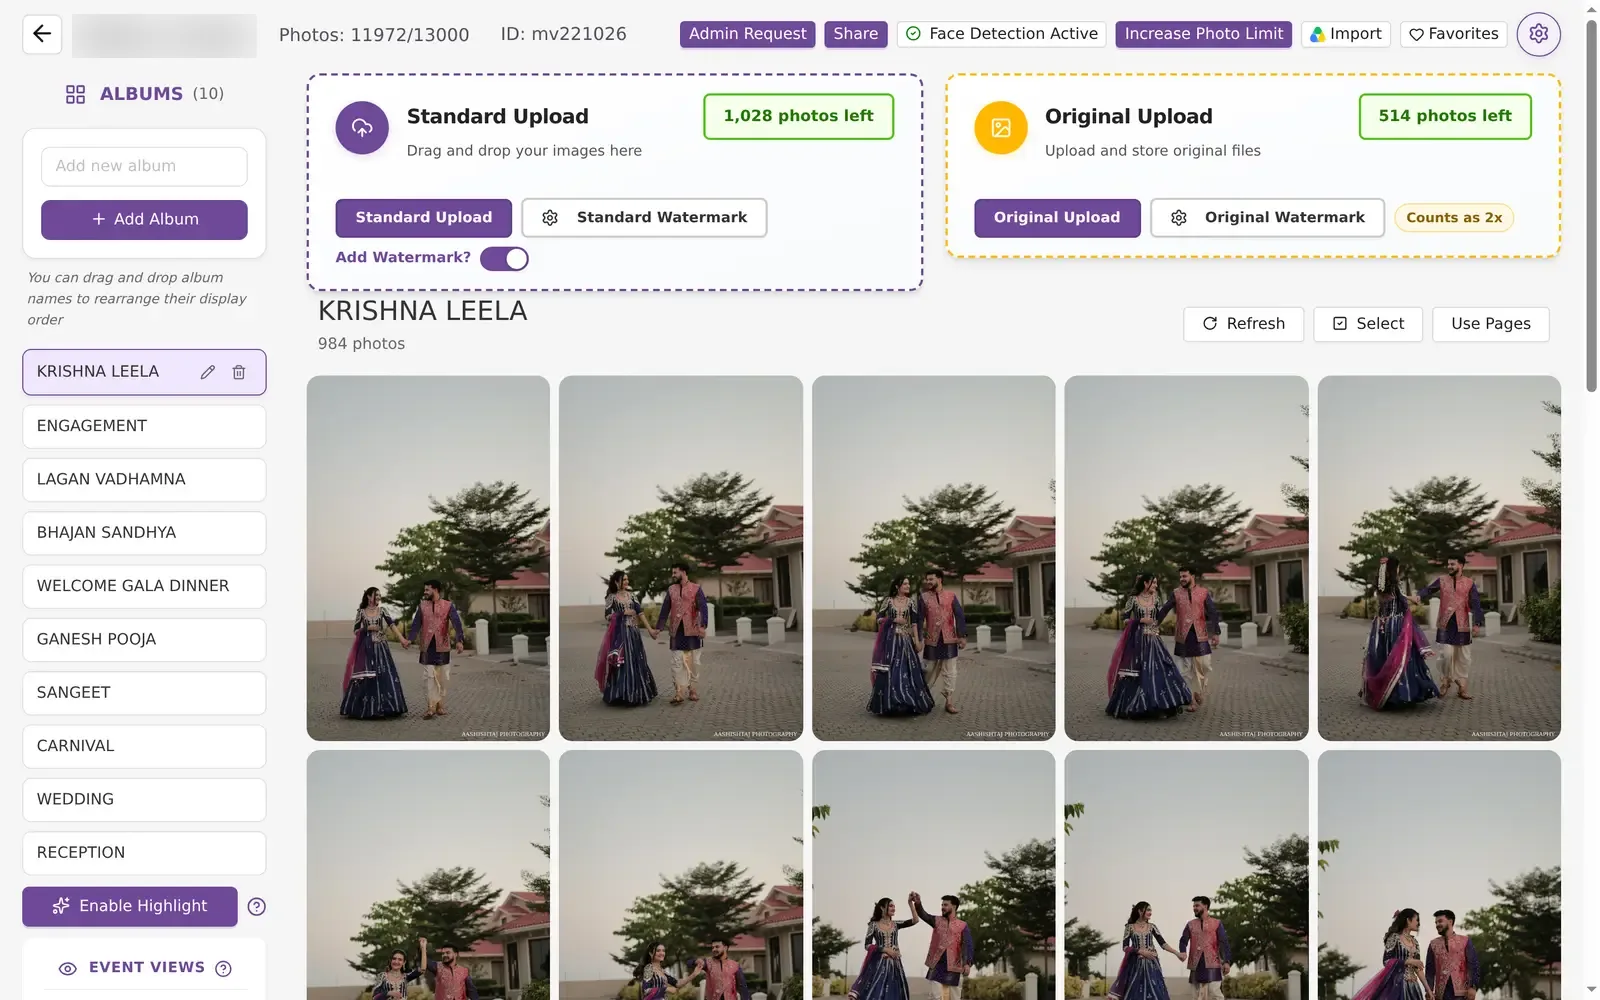
The top bar

- Photos shows how many photos are used out of the limit.
- ID is the event ID guests type in the app.
- Share opens the links, QR codes and PIN.
- Enable Face Detection buys face recognition. It reads Face Detection Active once it is on.
- Increase Photo Limit adds photos. See Increase an event's photo limit.
- Import brings photos in from Google Drive.
- Favorites shows the photos guests liked. See Event favourites.
- The gear opens the event settings. See Event settings.
Albums
Albums split an event into parts, such as Haldi, Sangeet and Reception, or Sports Day and Annual Day. Type a name in Add new album and click + Add Album. Drag album names to change their order. Use the pencil and bin next to an album name to rename or delete it. Click an album to see its photos.
Face recognition
Face recognition lets each guest take a selfie and see only the photos they are in. It is bought per event and lasts 12 months. In India it costs ₹750 for events up to 4,500 photos and ₹1,000 for larger events ($10 and $15 outside India). Renewing before it expires is 50% off.
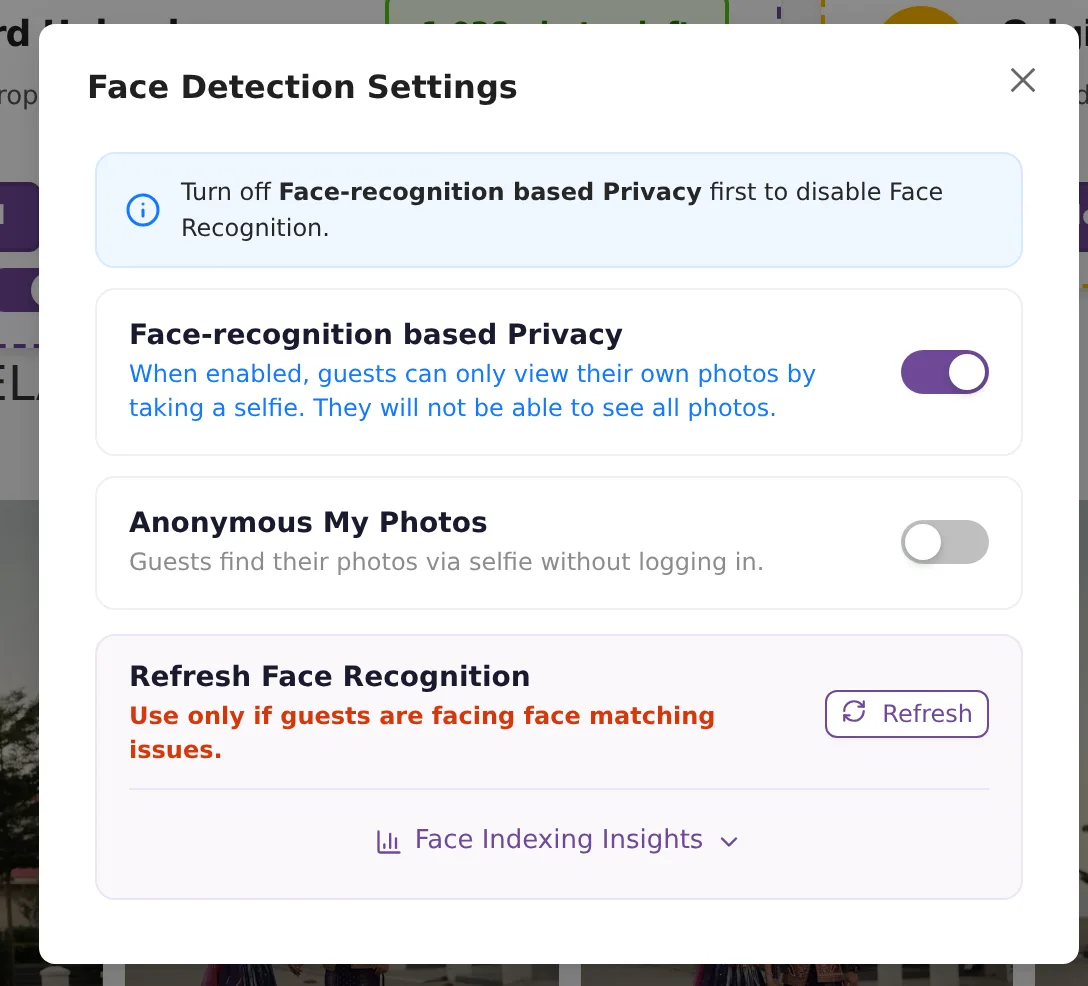
Once it is on, click Face Detection Active to open its settings. There you can turn on Face-recognition based Privacy so guests see only their own photos, and check how many faces have been indexed.
Share the event
Click Share. The Message tab has a ready-made message with the event ID and links. Send it by WhatsApp or email, or copy it. Web Gallery Link copies just the link.
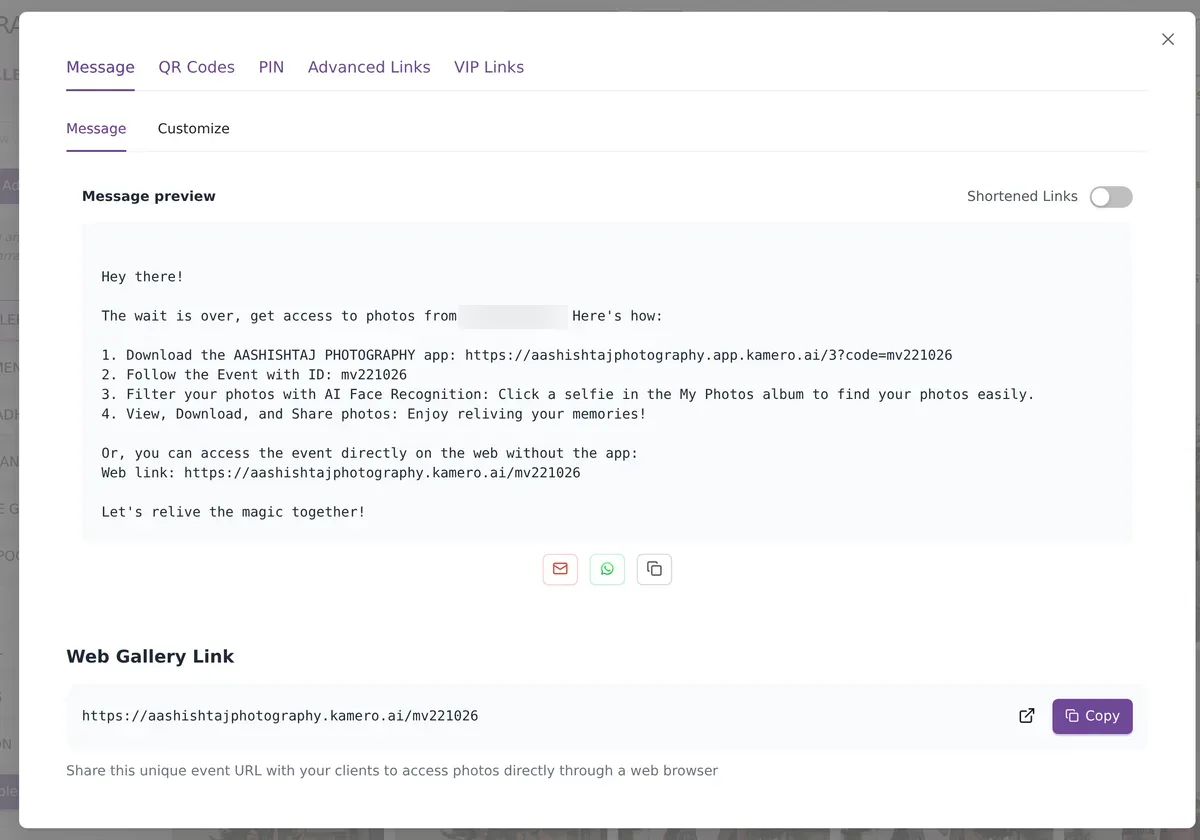
The other tabs:
- QR Codes: one QR code for the mobile app and one for the web gallery. Change the style, corners and colour, add your logo, and download PNG or SVG files to print.
- PIN: the PIN needed to download all photos from the web link (up to 5 times) and to view all photos when privacy is on. Give it only to the host.
- Advanced Links: links to one album, a link that opens My Photos, and a personalised gallery link.
- VIP Links: links that skip sign-in, or carry the PIN, for close family.
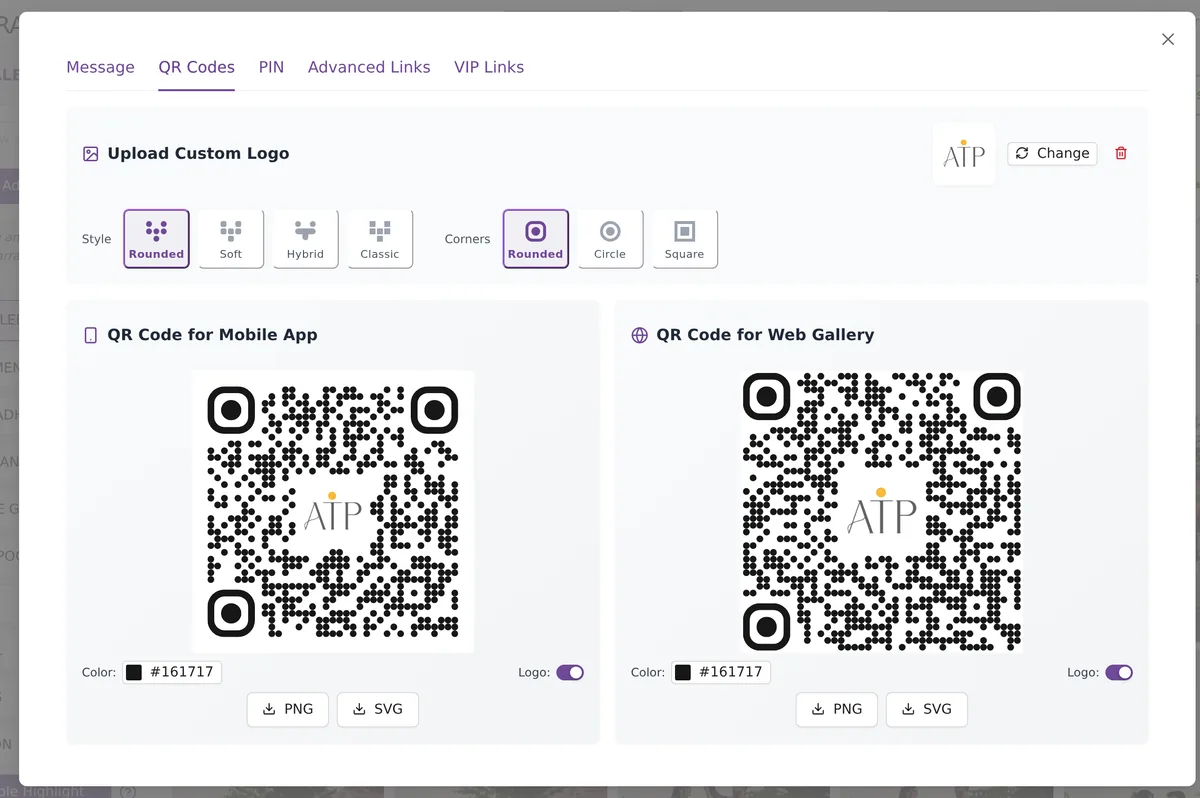
For one QR code that always opens your latest events, see Common QR code.
Next steps
Frequently asked questions
How many photos can an event hold?
As many as the pack you create it from. A Kam 100 pack gives the event 100 photos. You can add more at any time with Increase Photo Limit on the event page. A Standard Upload uses 1 photo of the limit and an Original Upload uses 2.
How long does an event stay online?
An event made from a pack lasts 12 months from the day you create it. The free trial event every new account gets lasts about 45 days (1 month and 15 days) and cannot be renewed. A subscription event lasts as long as your subscription. The Event Date you type in the form is only shown to guests and does not change this. The card on My Events shows the exact Valid up to date.
Where do I choose Standard or Original quality?
Not in the create form. You choose it each time you upload, with the Standard Upload or Original Upload panel on the event page. You can use both in the same event.
Is face recognition included when I create an event?
No. Face recognition is a separate purchase for each event, valid for 12 months. In India it costs ₹750 for events up to 4,500 photos and ₹1,000 above that. Renewing it before it expires is 50% off.
Can I change the event ID later?
Yes, with the pencil next to the ID on the event card. For pack events you can do this only in the first 60 days after you create the event. After that, contact support. The old link and QR code stop working when the ID changes.
What happens when an event expires?
The card shows Expired on with a date. A pack event has Renew, Delete Event and Share Renewal Link buttons. A subscription event shows Renew Subscription instead. Kamero may archive (remove) an event 7 days after it expires; renew before then to be safe.
More Events tutorials
Try it in your dashboard
Sign in to Kamero and follow along. Questions? Raise a support ticket from the dashboard.