How to set up Sell Photos and get paid for event photos
Sell Photos lets you sell event photos to the people in them. Say you shoot a school Sports Day. You upload the photos, set a price, and share the event. Parents take a selfie, see the photos of their child, and buy the ones they want. The gallery shows a watermark until the photo is paid for.
Where to find Sell Photos
Click Sell Photos in the top bar. On a phone, tap Sell. The page lists your Sell Photos events. At the top you have a search box, Seller Dashboard, Settings and Create Sell Photos Event.
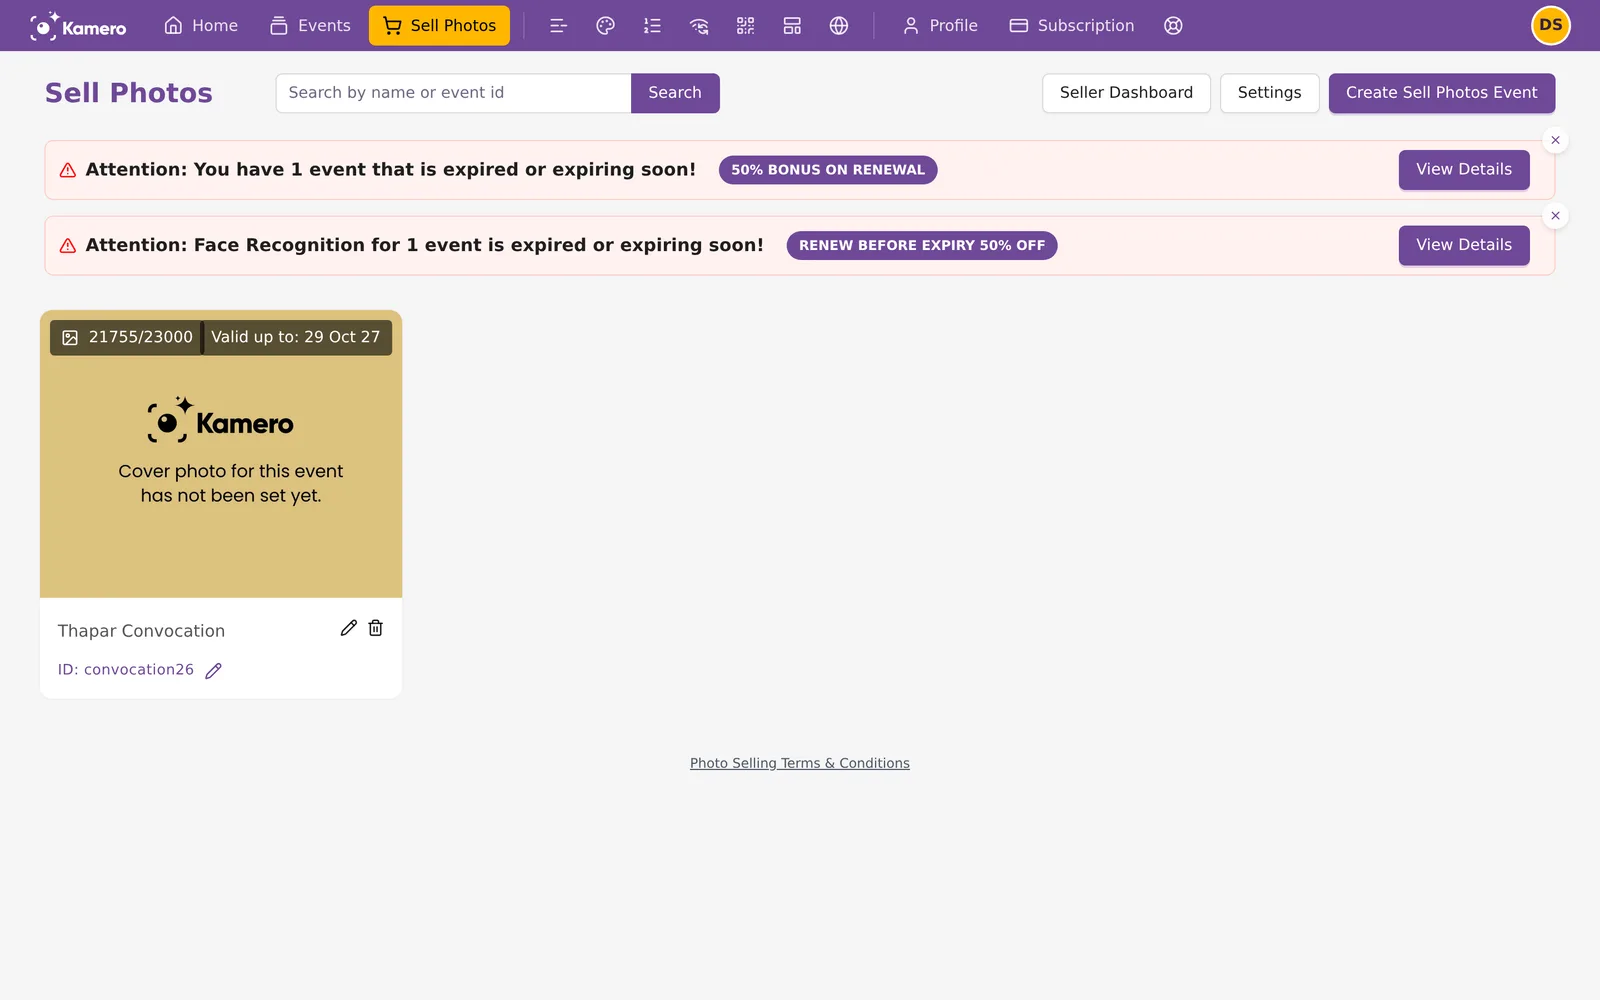
Each event card shows how many photos are uploaded against its limit, and the date it is valid up to. If an event is about to expire, a notice at the top links to its renewal. A banner also tells you what is missing before you can sell, such as Add business details or Choose a plan.
Before you start: how buyers pay
The currency you sell in decides how buyers pay you:
- INR: buyers pay through Kamero's payment gateway. Kamero keeps a commission, 20% of the cart amount by default, and adds the rest to your seller balance. You need saved Business Settings. You don't need a plan.
- Any other currency: buyers pay you directly, using the payment details you add in Business Settings. Kamero takes no commission. You need an active Sell Photos Plan instead.
The event's currency decides this, not where the buyer lives. A parent abroad can buy from an INR event through the gateway. Kamero sells digital photos only, with no prints. For the money side in detail, see Commission, GST and payouts.
Step 1: Sell Photos Settings
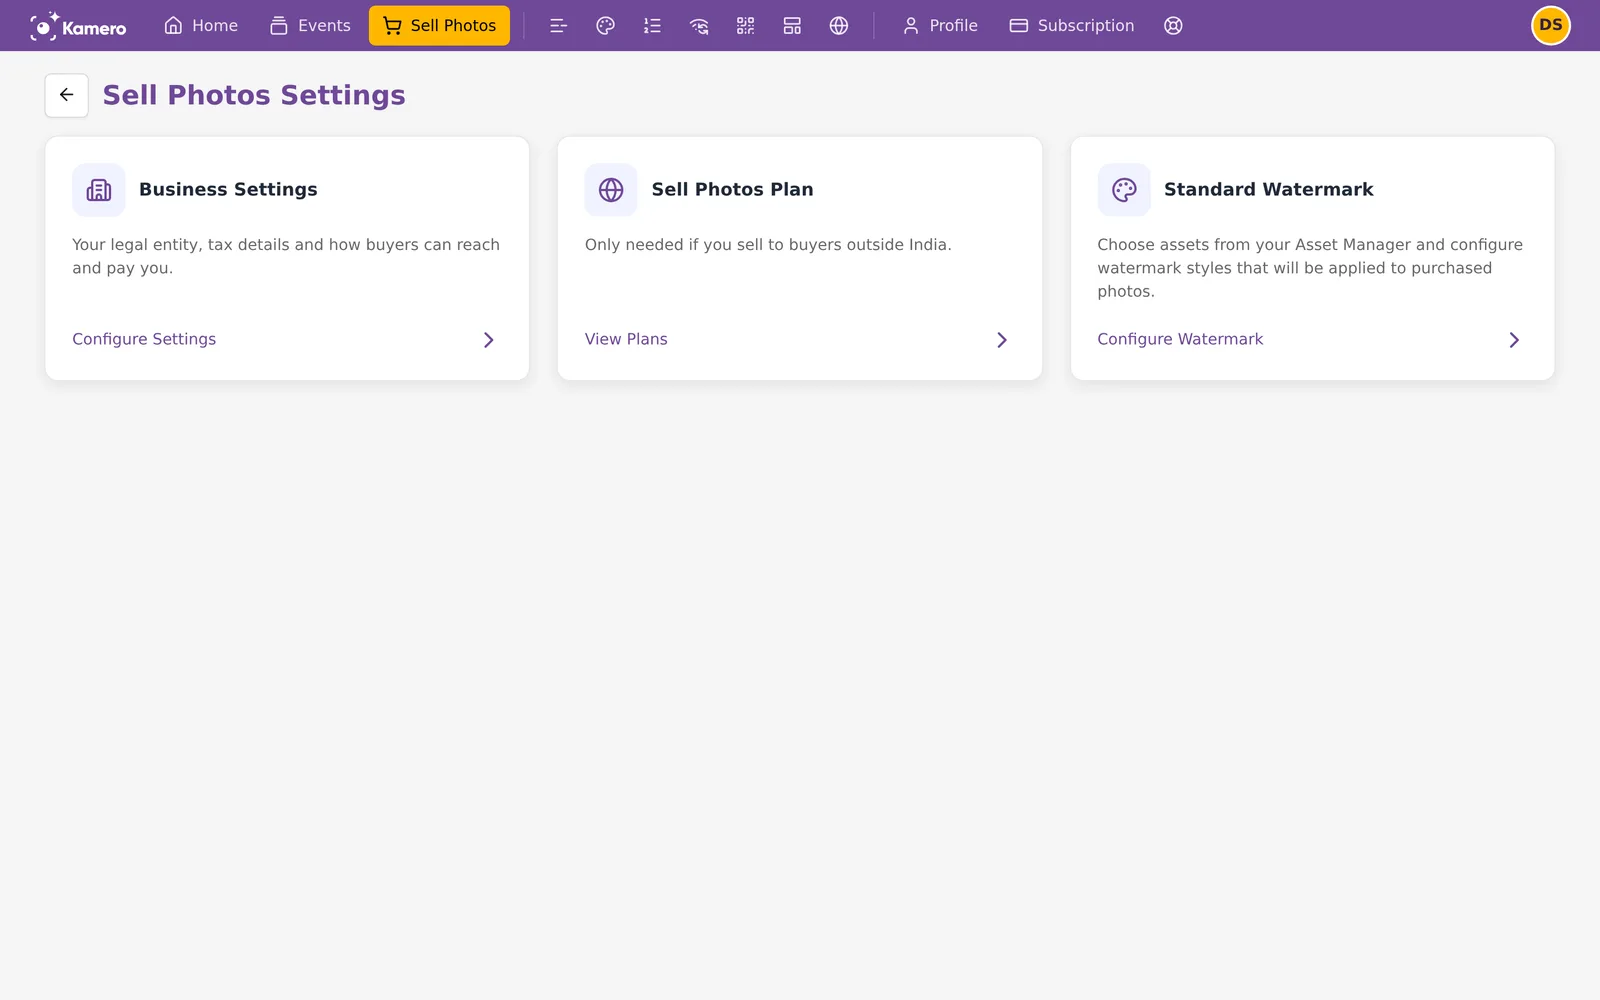
Click Settings on the Sell Photos page. You see three cards:
- Business Settings: your legal entity, tax details, bank account, and how buyers can reach and pay you. Click Configure Settings.
- Sell Photos Plan: the yearly plan for sales outside INR. Click View Plans.
- Standard Watermark: the watermark shown on photos for sale. Click Configure Watermark.
Step 2: Business Settings
Open Business Settings and pick your currency under Select your currency. The form you see depends on that choice.
Selling in INR
Kamero collects the money, so it needs your business, tax and bank details to pay you. A bar at the top shows how much of the form is complete. Fill in:
- Business Details: your Legal Entity Name, 3 to 100 characters.
- GST Information: switch on Is your business registered under GST? if you are, and enter your GST Number. Enter your PAN Number.
- Required Documents: upload your GST certificate, PAN card, ID card and a cancelled cheque. If you are not registered for GST, upload a declaration letter in place of the GST certificate. Files can be JPG, PNG, PDF, WebP, AVIF, BMP or TIFF, up to 10MB each.
- Business Address: your address. The postal code is 6 digits.
- Bank Details: account holder, account number, IFSC, bank name and branch. Payouts go to this account.
- Click Save Information.
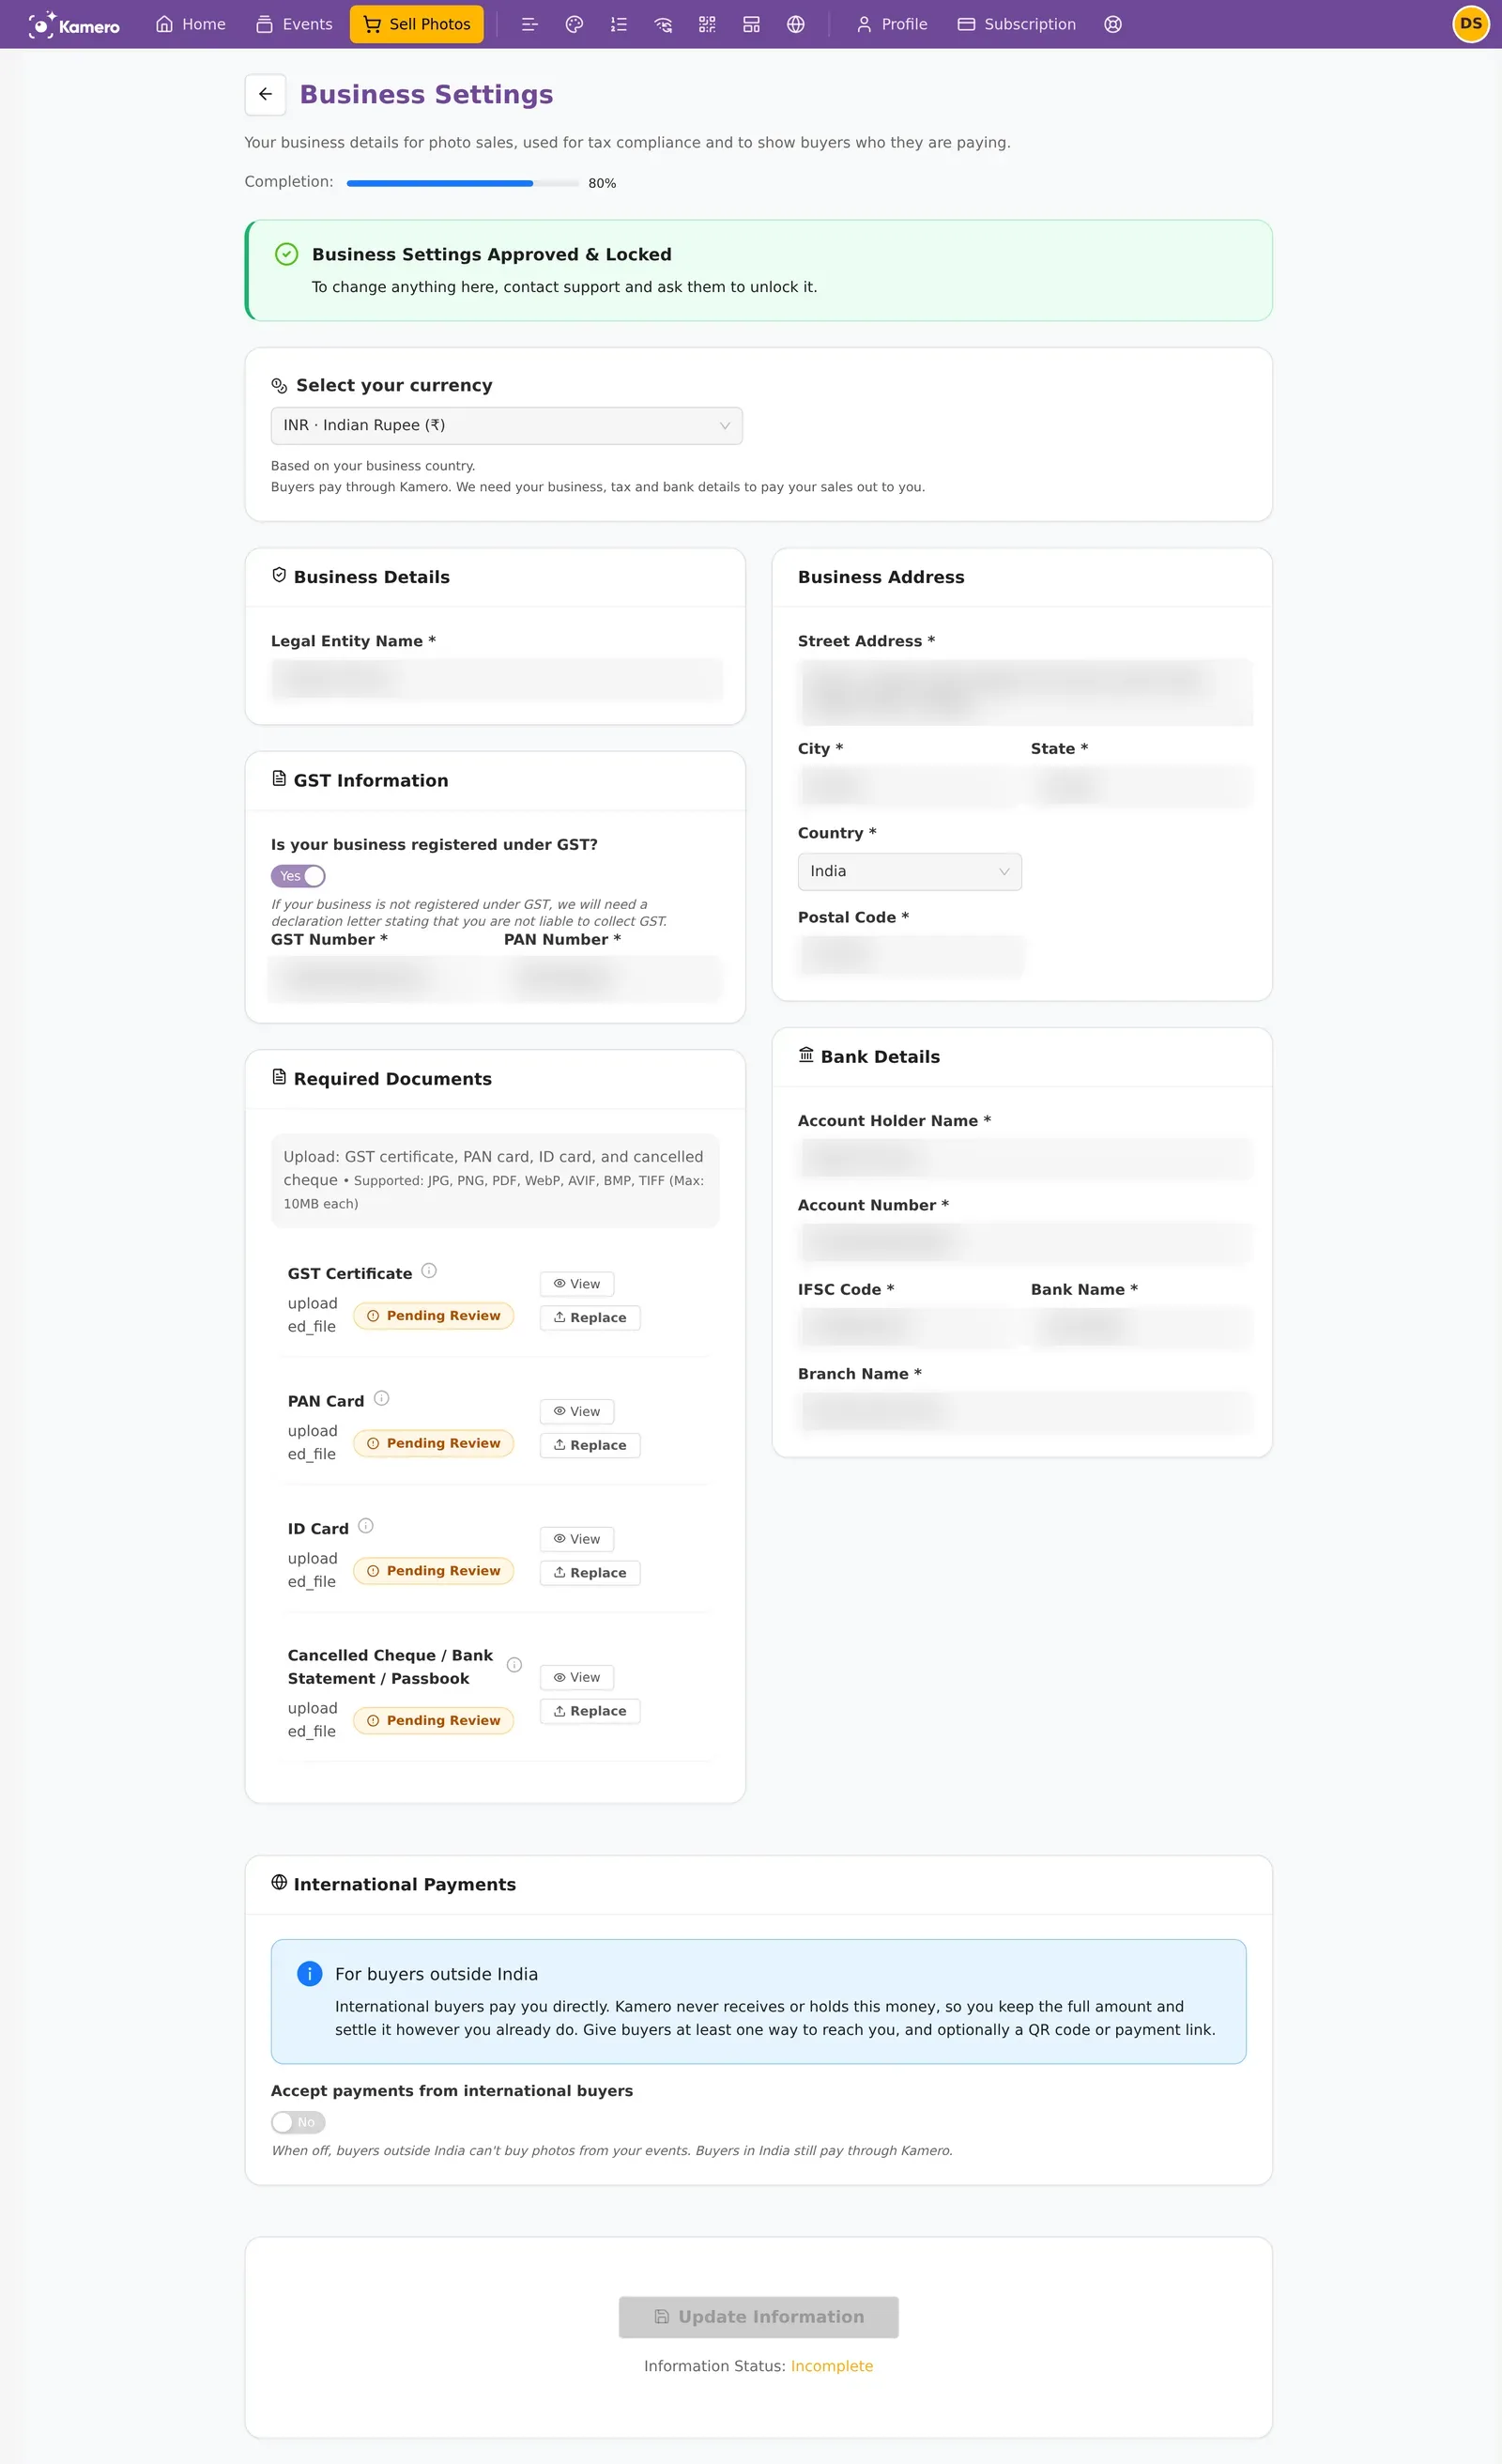
Buyers can pay as soon as your Business Settings are saved. Each document shows Pending Review, Verified or Rejected. When Kamero approves your details, the page says Business Settings Approved & Locked. Approval is needed before your balance can be paid out. To change anything after that, contact support and ask them to unlock it.
Pricing some events in another currency
Buyers outside India can already buy from your INR events through Kamero. You don't need to change anything for them.
At the bottom of the INR form, International Payments has a switch for Accept payments from international buyers. Turn it on only if you want to price some events in another currency, such as US dollars. Add how buyers pay you for those events: an email, WhatsApp, phone number, a payment link starting with https, or a payment QR code. Buyers pay you directly for those events, and you need a Sell Photos Plan. Your INR events still go through Kamero.
Selling in another currency
If you pick a currency other than INR, you get a shorter form: Your brand, How buyers reach you, How buyers pay you and Payment instructions. Buyers see these details at checkout. Click Save. For the full walkthrough, see Sell in other currencies.
Step 3: Choose a Sell Photos Plan (only outside INR)
Open View Plans from Sell Photos Settings. The plans are yearly and paid in US dollars:
- Starter: $100 a year, 200 orders per year.
- Growth: $250 a year, 600 orders per year.
- Pro: $500 a year, 1,500 orders per year.
Every plan has no commission on sales, and buyers pay you directly. Click Choose Starter, Choose Growth or Choose Pro and finish the payment.
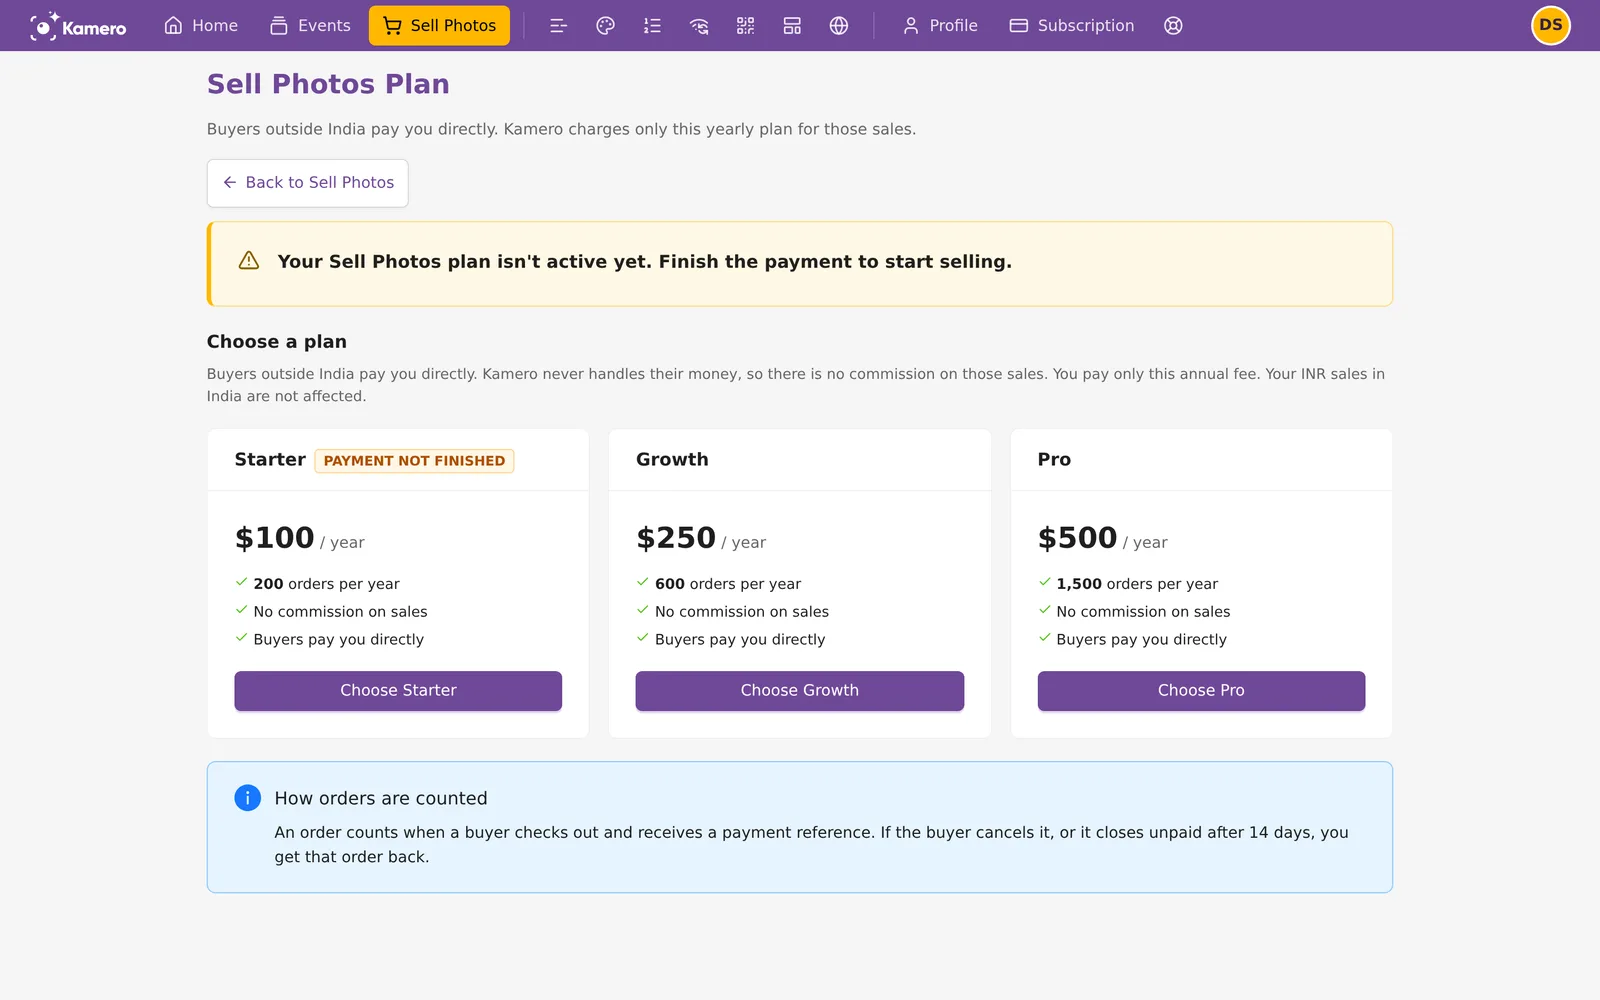
An order counts when a buyer checks out and gets a payment reference. If the buyer cancels it, or it closes unpaid after 14 days, you get that order back. When you have used 80% of your orders, the Sell Photos page warns you. When all of them are used, buyers can't check out until the plan renews. To get more orders, contact support.
If a renewal payment fails, you have 3 days to fix it before the plan stops. You can also switch off auto-renew from this page.
Step 4: Set up the watermark
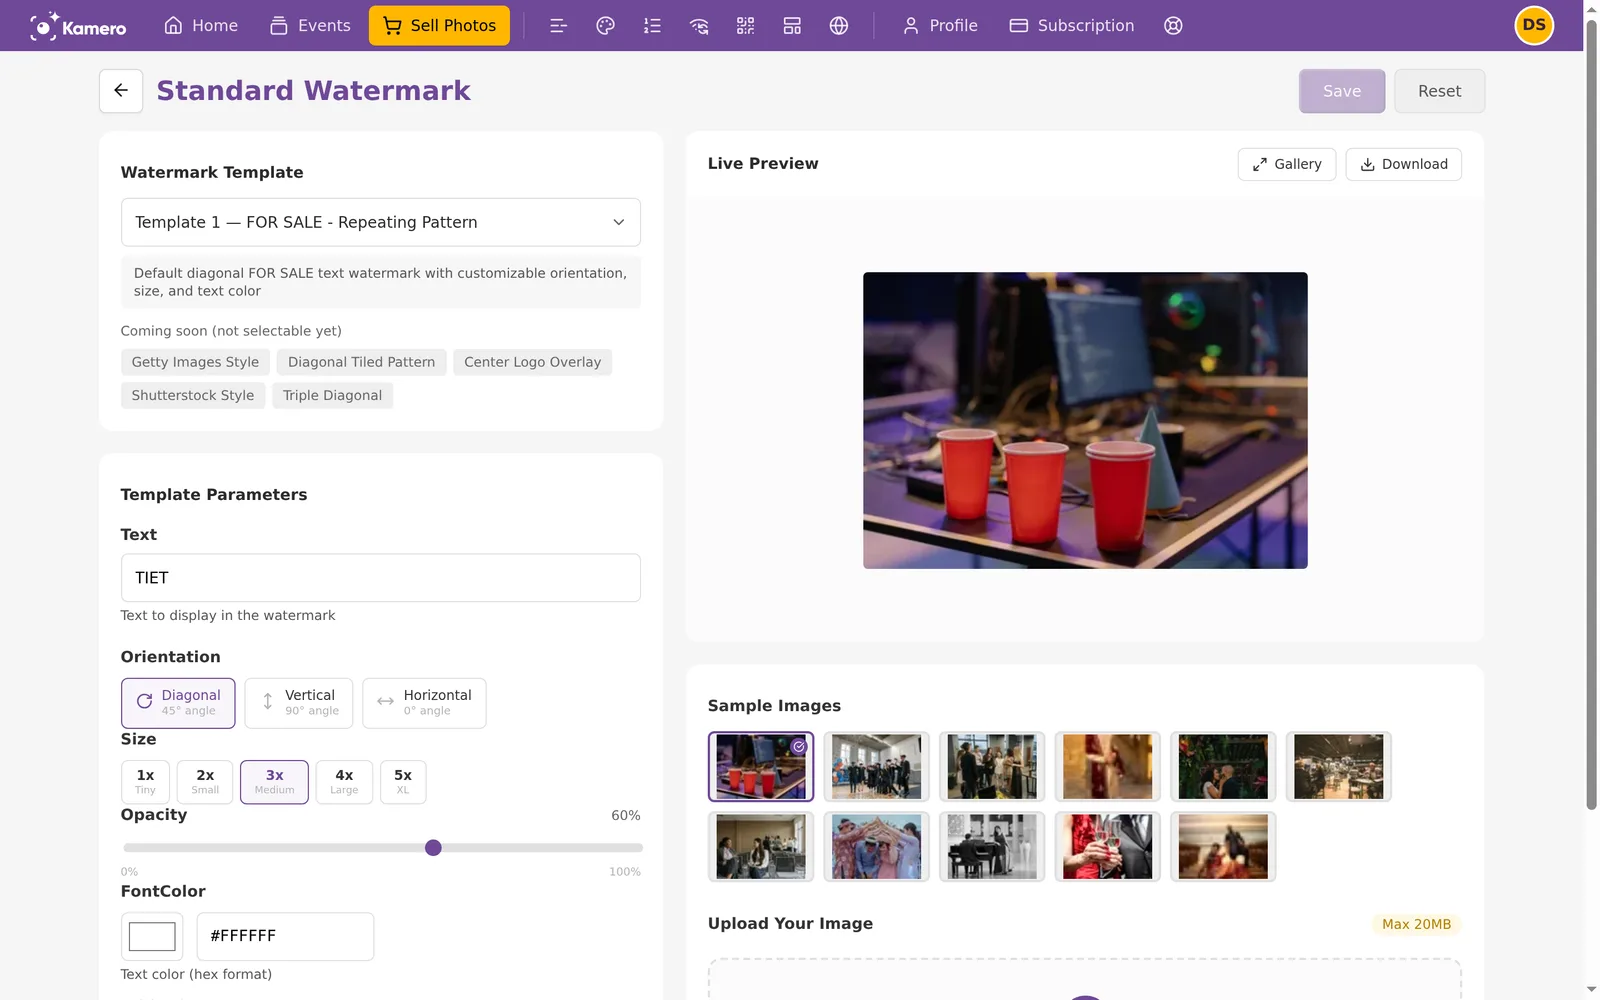
Open Configure Watermark from Sell Photos Settings. This watermark is shown on every photo for sale until the buyer pays.
- Under Watermark Template, pick Template 1 (repeating FOR SALE text) or Template 5 (large text in the center). Other templates are marked coming soon.
- Set the Text, such as your studio or school name.
- Pick an Orientation: Diagonal (45°), Vertical (90°) or Horizontal (0°).
- Pick a Size from 1x (tiny) to 5x (extra large).
- Set the Opacity, from 0% to 100%. The default is 60%.
- Set the FontColor as a hex code, or pick a quick color.
- Check the Live Preview on a sample image, or upload your own image (up to 20MB). Click Save.
For other ways to watermark your work, see Standard watermark.
Step 5: Create a Sell Photos event
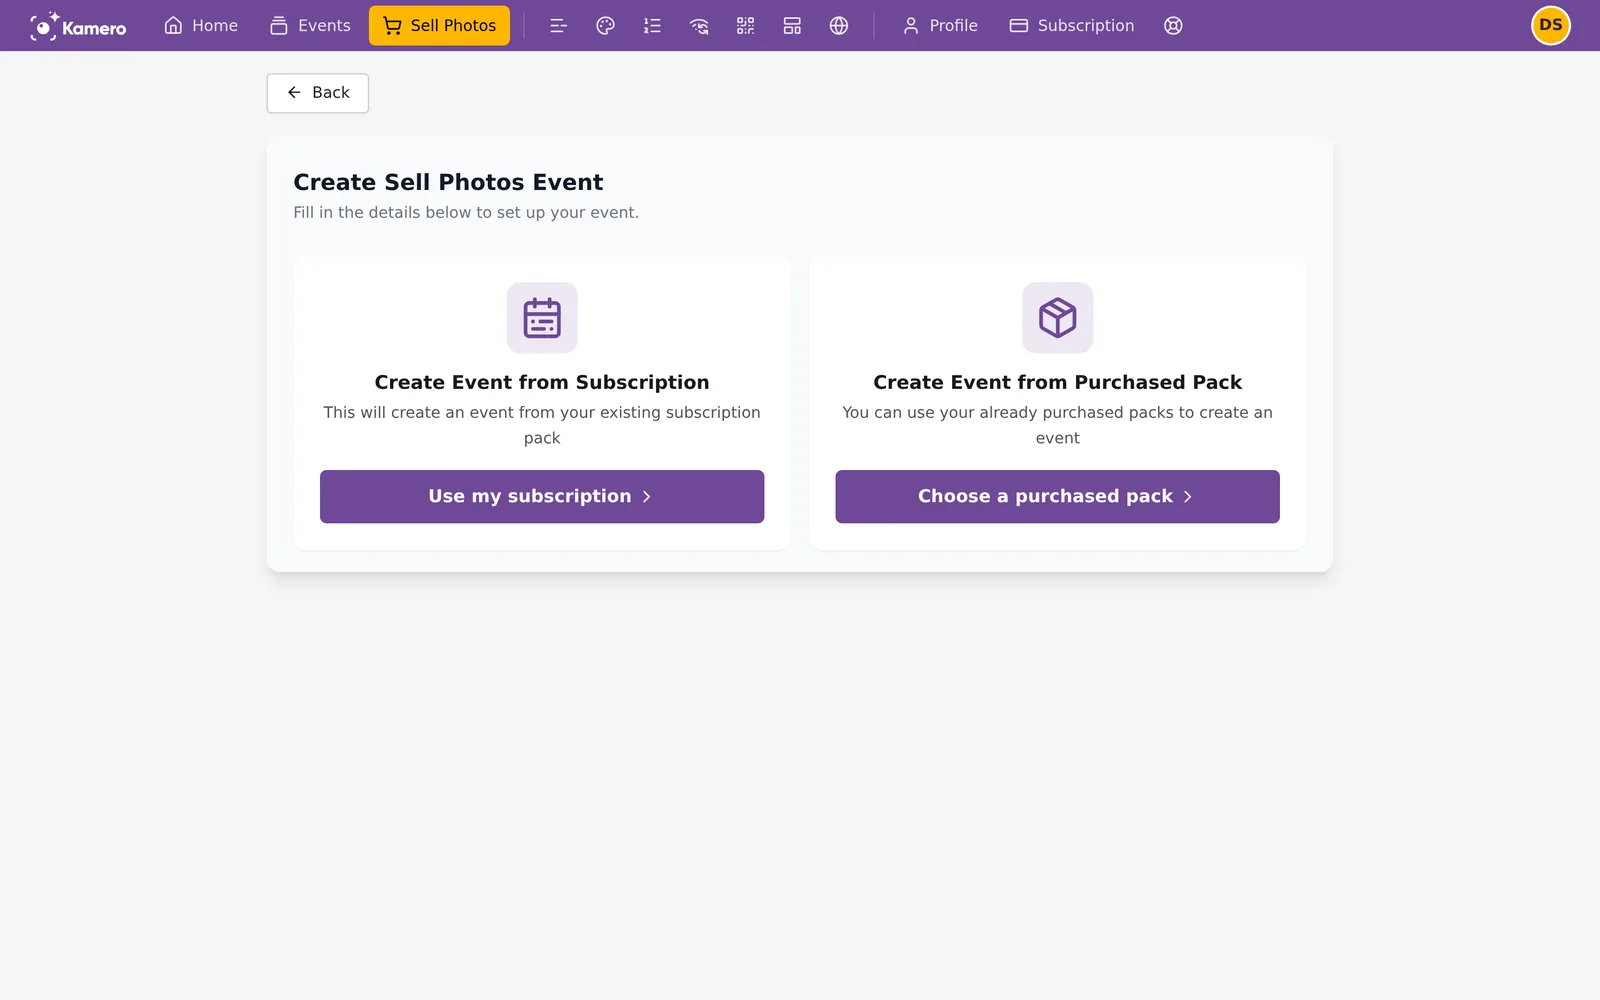
- On the Sell Photos page, click Create Sell Photos Event.
- Choose Use my subscription to use your subscription, or Choose a purchased pack to use a photo pack you have bought.
- Fill in the event details, for example "Sports Day 2026". The currency is filled in from your Business Settings or your last event. You can change it.
For more on creating events and photo packs, see Create an event and Subscription plans and buying.
Step 6: Upload photos
Open the event from the Sell Photos page. The top shows the photo count against the limit, the price per photo and the event ID. Make albums on the left, such as "Class 5A" or "Relay races", with Add Album. Drag album names to change their order.
Click Standard Upload to add photos. The card shows how many more photos you can upload. Kamero adds the watermark to each photo, so new photos take a minute or two to appear.
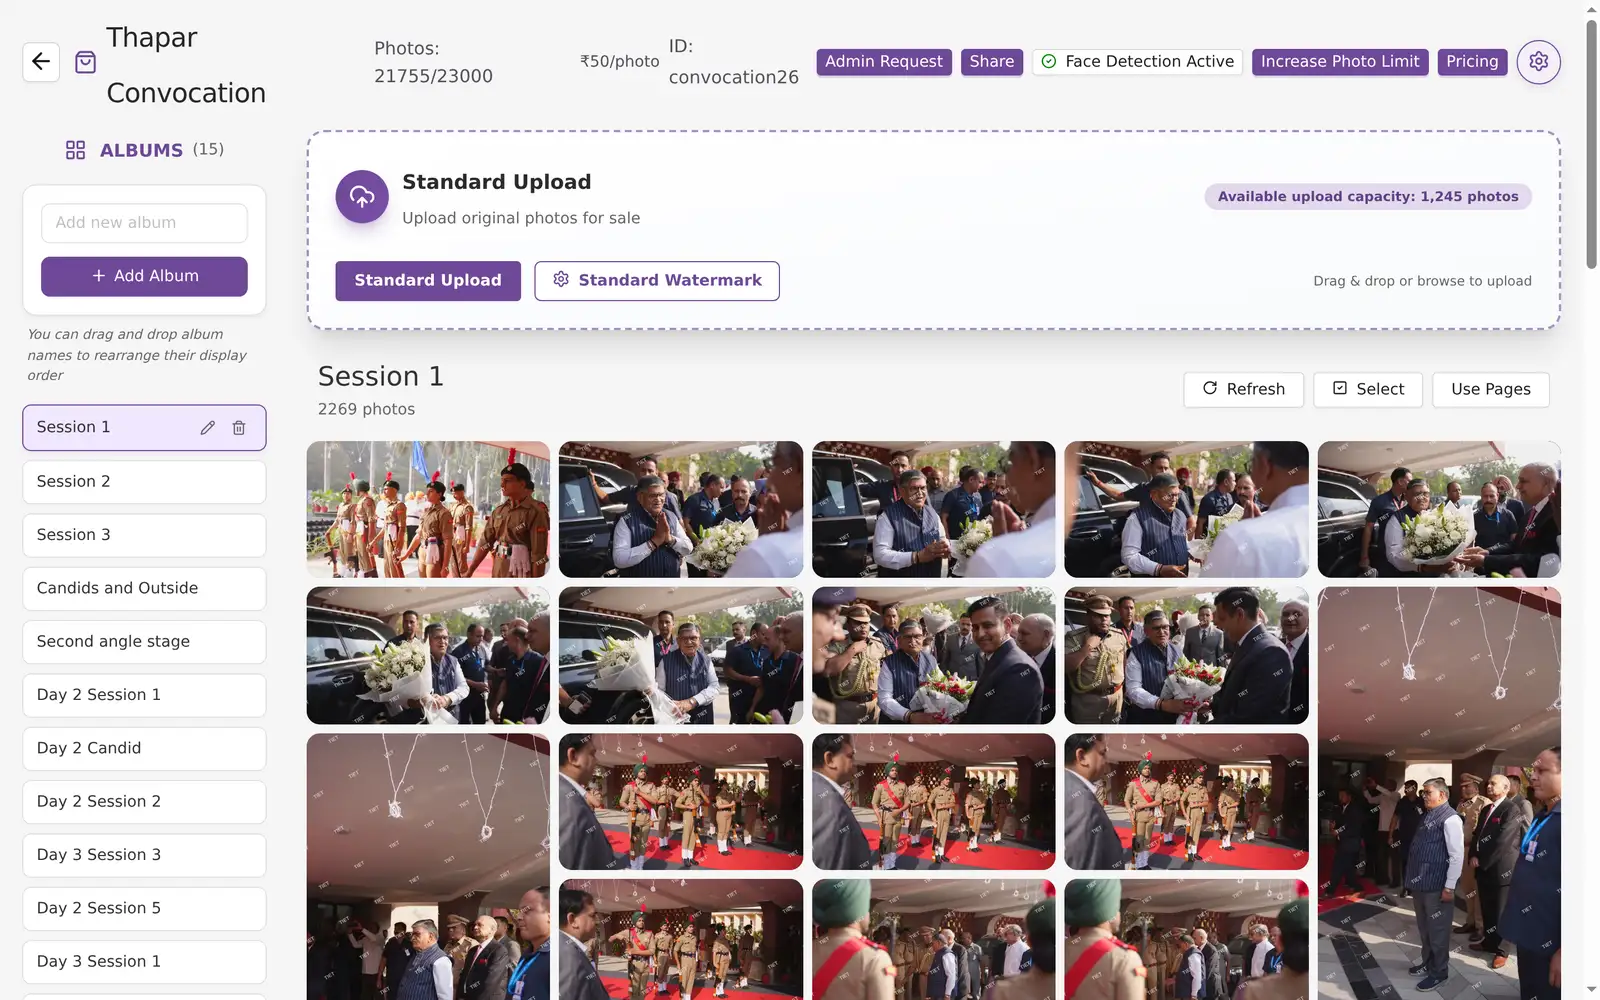
Need more room? Click Increase Photo Limit. See Increase event photo limit.
Step 7: Set your prices
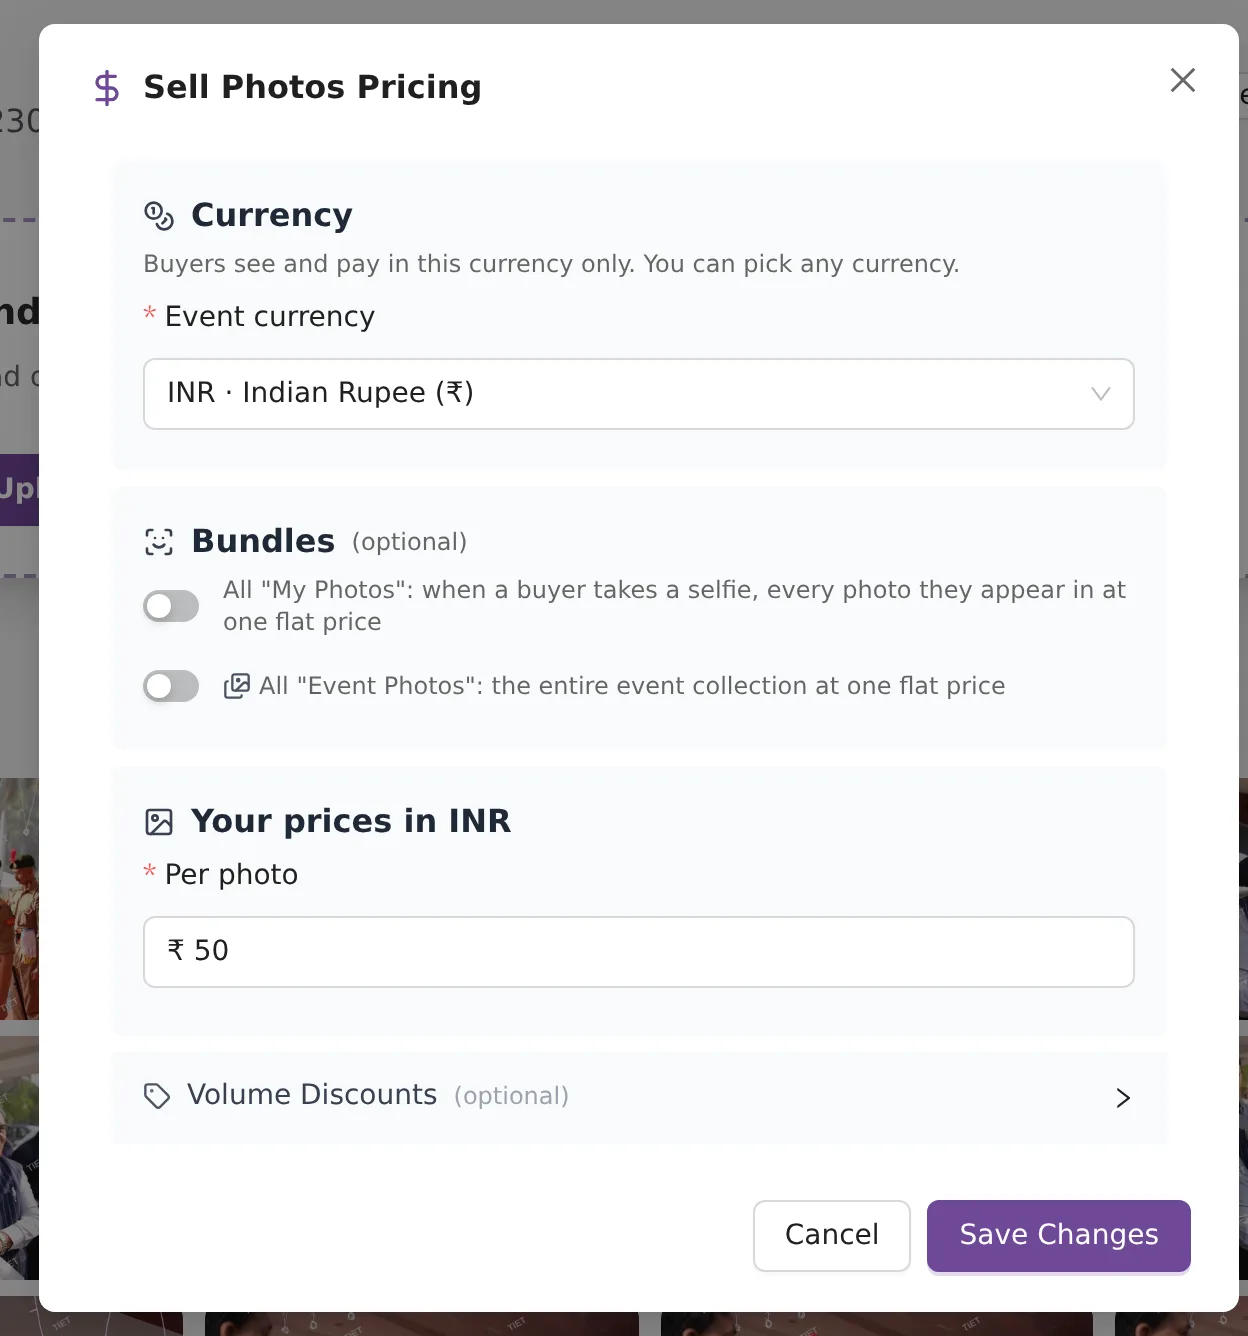
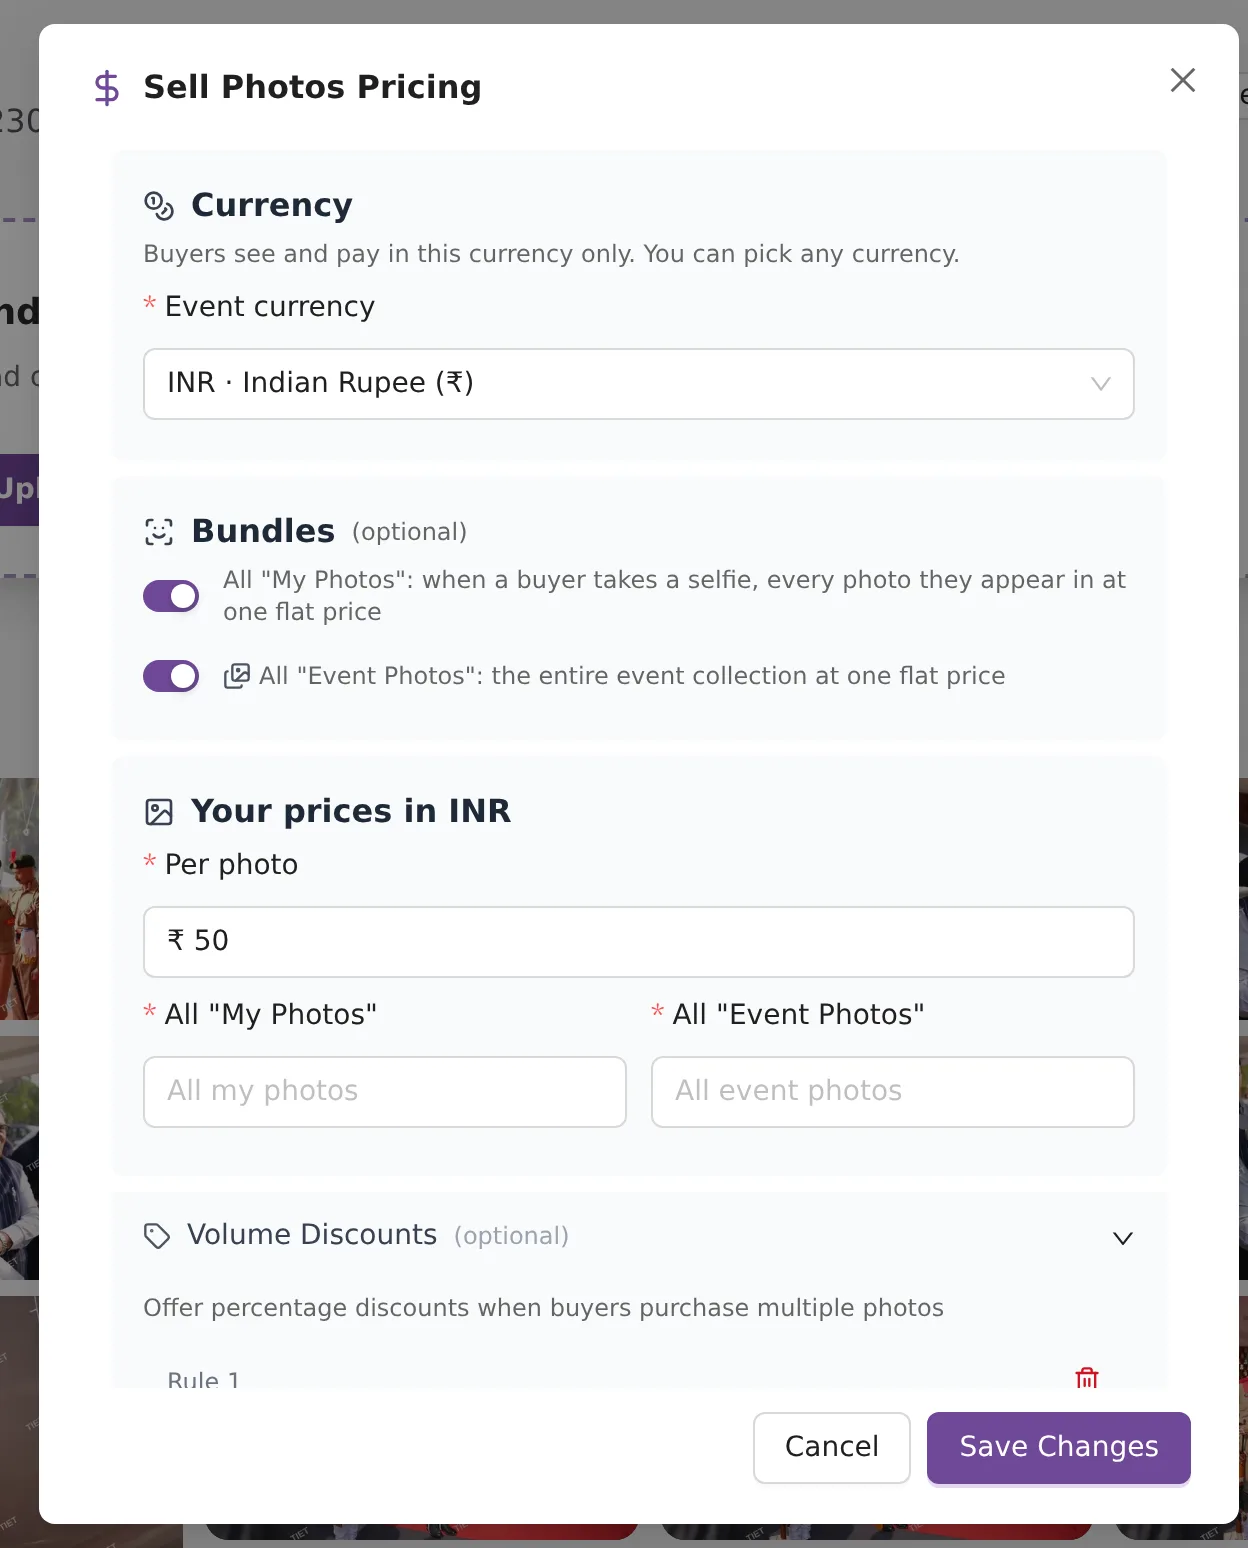
On the event page, click Pricing. The Sell Photos Pricing window opens.
Currency
Pick the Event currency. Buyers see and pay in this currency only, and each event has one currency. If your Business Settings are for INR and you pick another currency, you see a warning: only INR goes through Kamero, so turn on international payments in Business Settings first.
Bundles
Bundles are optional. Turn on either switch to offer it:
- All "My Photos": a buyer takes a selfie and buys every photo they appear in at one price.
- All "Event Photos": the whole event at one price.
Your prices
Per photo is required. When a bundle is on, its price box appears next to it.
- Every price must be above 0 and at most 1,000,000,000.
- Each bundle must cost more than one photo.
- All "Event Photos" must cost more than All "My Photos".
- Decimals follow the currency. Japanese yen takes whole numbers only.
For example, for Class 5A's Sports Day you might charge ₹50 per photo, ₹300 for All My Photos and ₹2,000 for All Event Photos.
Volume Discounts
Open Volume Discounts to give a percentage off when a buyer picks many photos. Click Add Discount Rule and set Min. Photos (3 to 10,000) and Discount % (1 to 100). You can add up to 5 rules. Each rule needs a different number of photos, in increasing order. For example: 10% off 5 photos, 20% off 10 photos.
Click Save Changes.
Step 8: Event settings
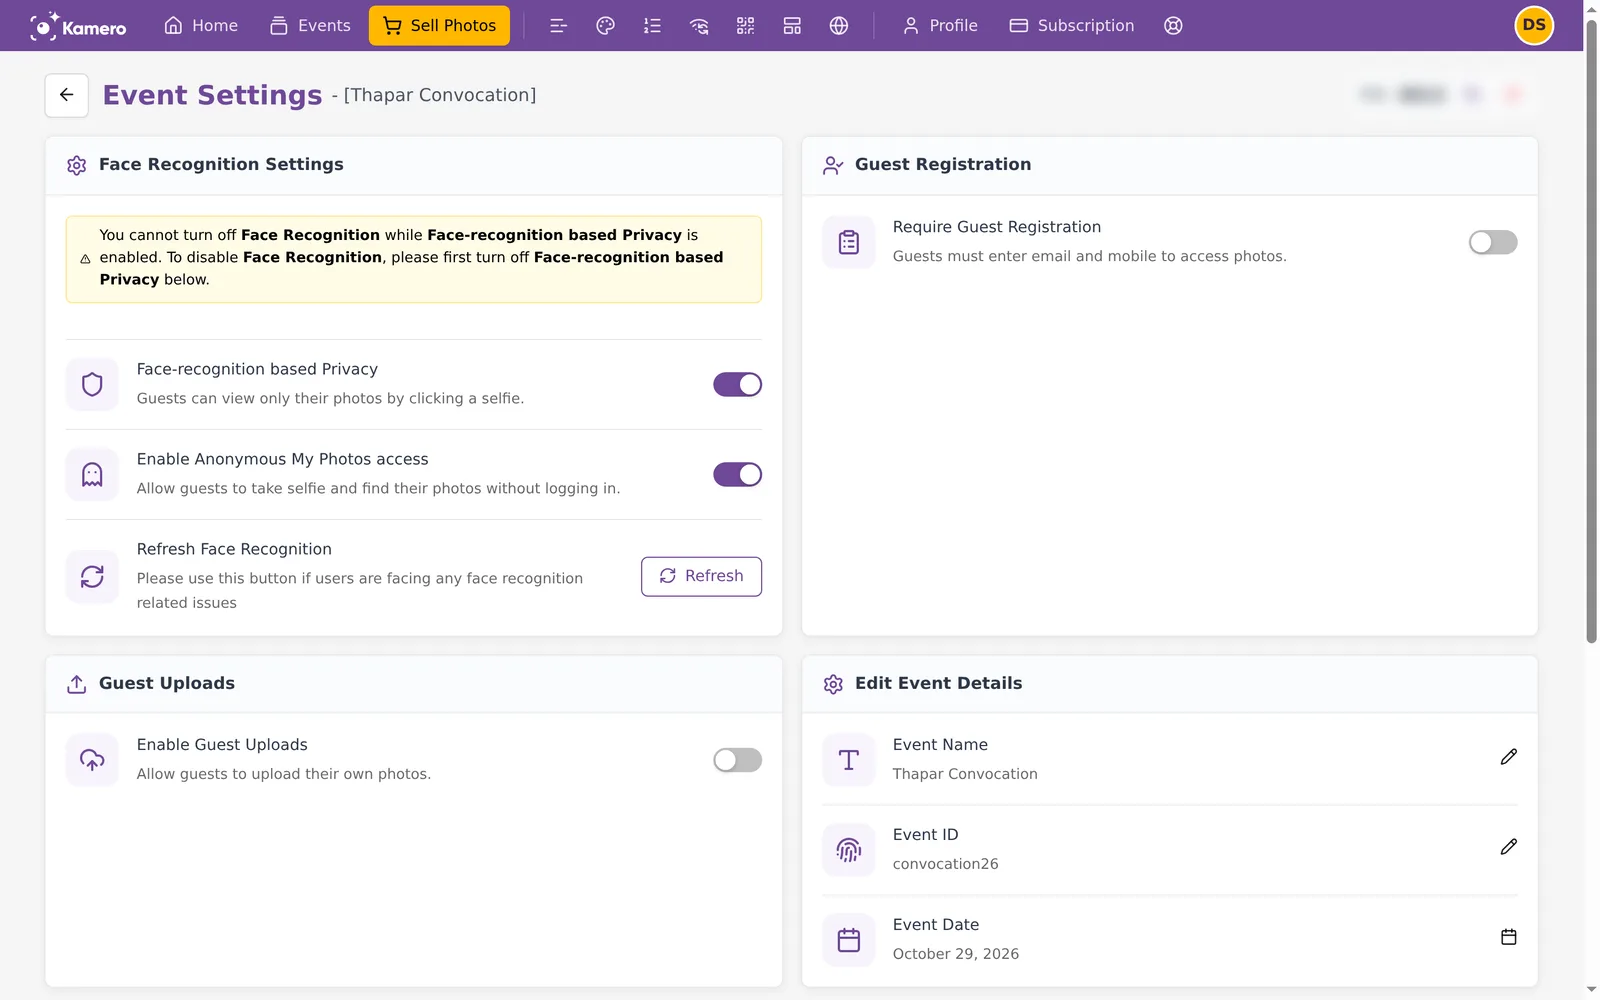
Click the gear button on the event page. The main settings for a Sell Photos event:
- Face-recognition based Privacy: guests see only their own photos after taking a selfie.
- Enable Anonymous My Photos access: always on for Sell Photos events. Buyers can take a selfie and find their photos without logging in. They sign in only at checkout.
- Refresh Face Recognition: use it if buyers can't find their photos.
- Require Guest Registration: guests must enter their email and mobile number first.
- Enable Guest Uploads, Edit Event Details (name, ID, date), event hosts, Show on my website and Allow Enquiry.
Dynamic watermark, branding, invites and event access settings are not available on Sell Photos events. For the rest, see Event settings.
Step 9: Share the event
Click Share on the event page and send the link to parents, for example in the class WhatsApp group. Buyers open the gallery, take a selfie to find their photos, pick single photos or a bundle, and check out:
- INR events: buyers pay through Kamero's payment page and can download the originals once the payment goes through. Single photos and carts are paid through Razorpay. The All My Photos and All Event Photos bundles are paid through PhonePe. If a buyer leaves a payment unfinished, they may need to wait up to 30 minutes before checking out the same photos again.
- Other currencies: buyers get a payment reference and your payment details. They pay you directly and quote the reference.
Step 10: Track sales on the Seller Dashboard
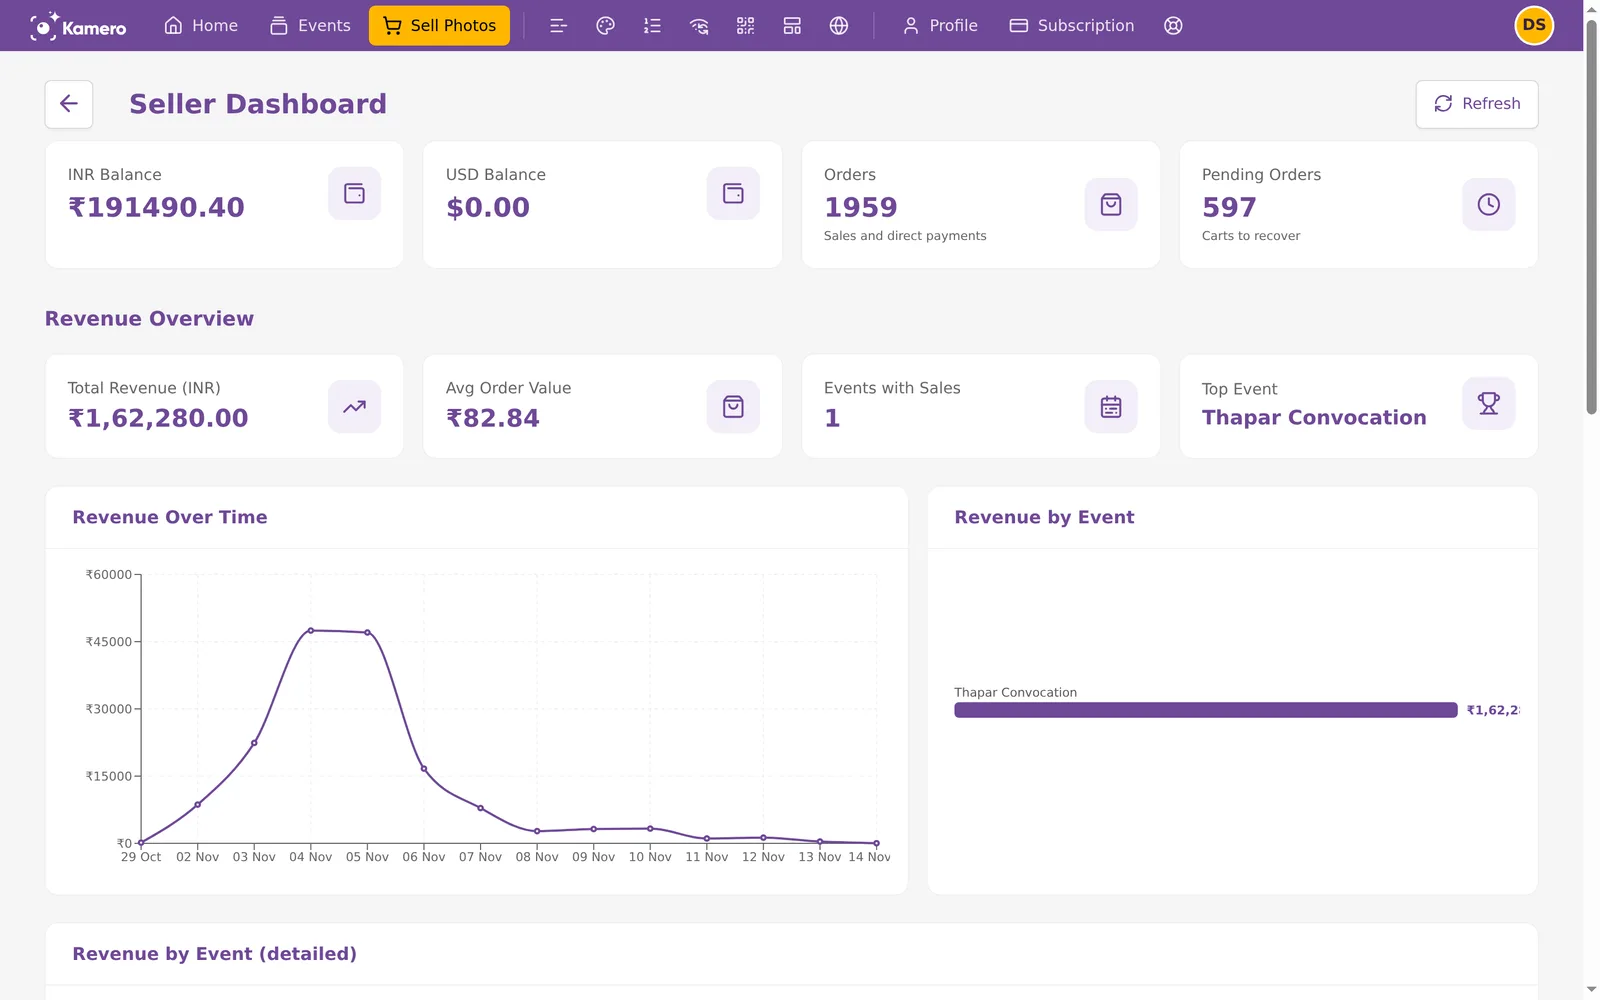
Click Seller Dashboard on the Sell Photos page. The top cards show:
- INR Balance and USD Balance: money you have earned that has not been paid out yet.
- Orders: sales and direct payments.
- Pending Orders: checkouts that were not paid, which you can follow up.
Revenue Overview shows total revenue, average order value, events with sales and your top event, with charts of revenue over time and by event.
Wallet Ledger tab
Every credit and debit to your seller balance. Each paid order adds a Credit for that sale order. Filter by CREDIT or DEBIT.
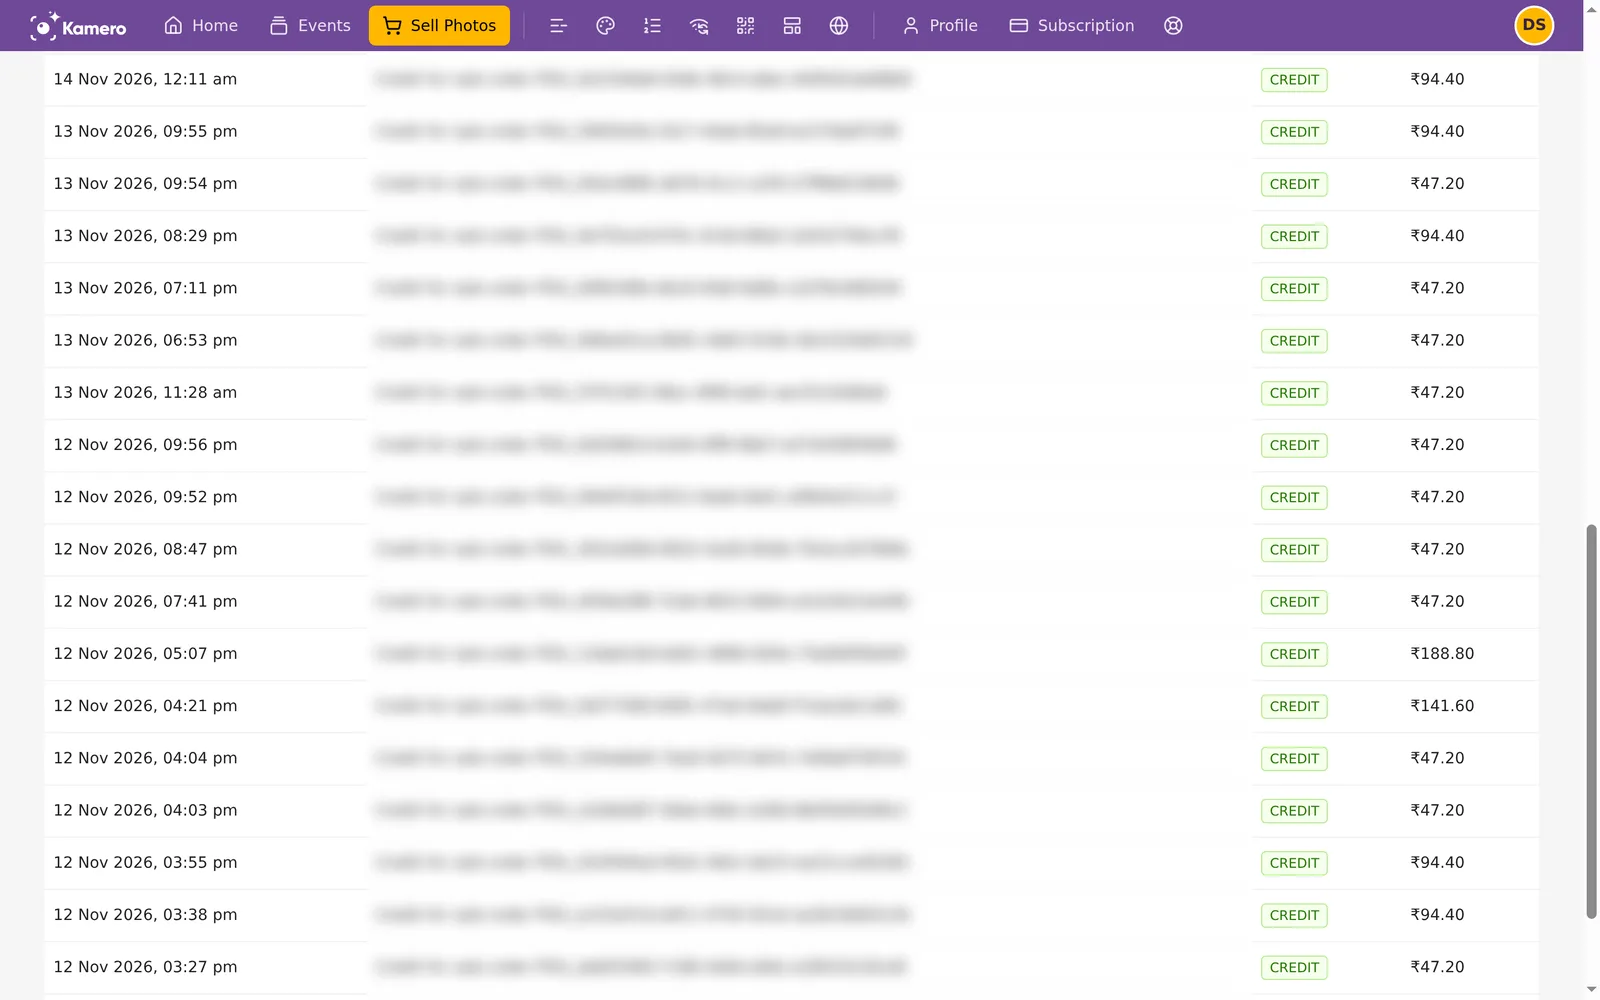
Photo Orders tab
Every order, with its type (Single Photo, Multiple Photos, All My Photos or All Event Photos), the buyer, the number of photos, the amount you get, the status and the date. Use Filter by event to see one event. Click Invoice or Receipt to download them.
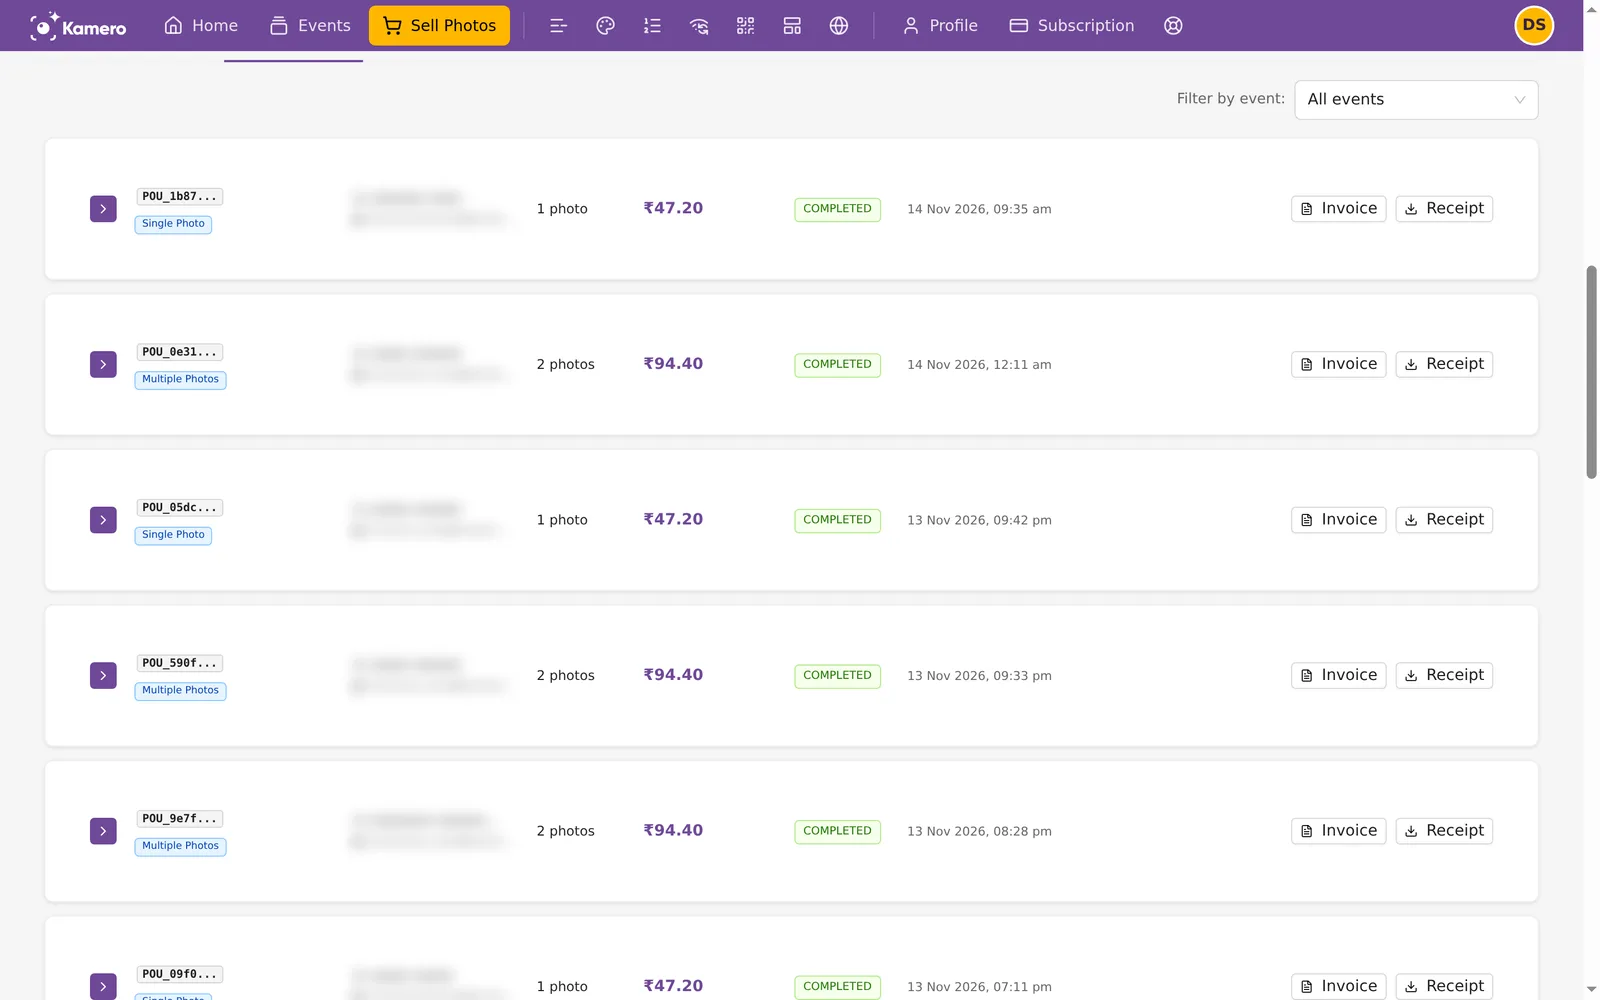
Click an order to open it. You see the buyer's details, the order details, the photos bought, and the Financial Breakdown.
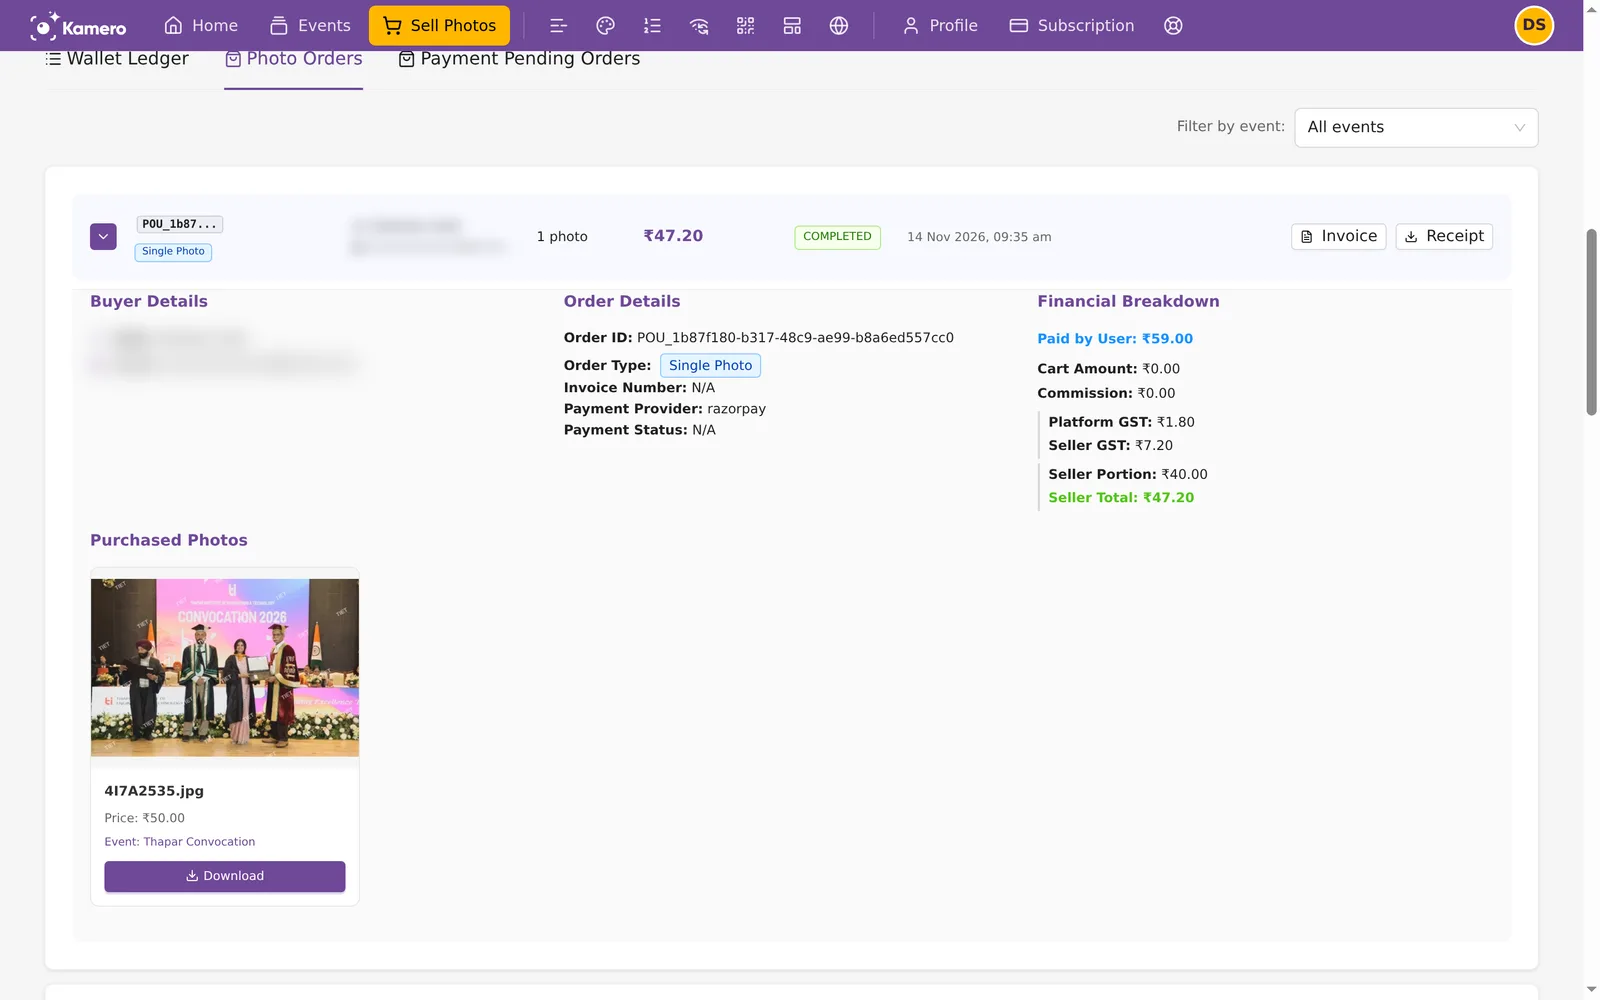
Kamero's commission is 20% of the cart amount before GST by default, and it includes the payment gateway charges. Here is how a ₹50 photo works out for a GST-registered seller:
- Paid by User: ₹59.00 (₹50 plus 18% GST).
- Seller Portion: ₹40.00 (₹50 minus Kamero's ₹10 commission).
- Seller GST: ₹7.20 (18% of your portion). It is 0 if you are not registered for GST.
- Platform GST: ₹1.80 (18% of Kamero's commission).
- Seller Total: ₹47.20, which is added to your INR Balance.
If you are not registered for GST, Seller GST is ₹0.00. The buyer pays ₹51.80 (₹50 plus ₹1.80 Platform GST) and your Seller Total is ₹40.00. Kamero does not deduct TDS. For more examples, see Commission, GST and payouts.
Order statuses
- COMPLETED: paid.
- PENDING, FAILED or CANCELLED: a gateway payment that did not finish.
- AWAITING PAYMENT: a direct-pay order the buyer has not paid yet.
- CHECK FOR PAYMENT: the buyer says they paid you. Check your account, then click Confirm payment and Yes, I received it. If the money did not arrive, choose Not received. The order goes back to awaiting payment so the buyer can pay again.
Unpaid direct-pay orders close after 14 days, and a buyer can have at most 3 unpaid orders with you at a time. See Sell in other currencies.
Payment Pending Orders tab
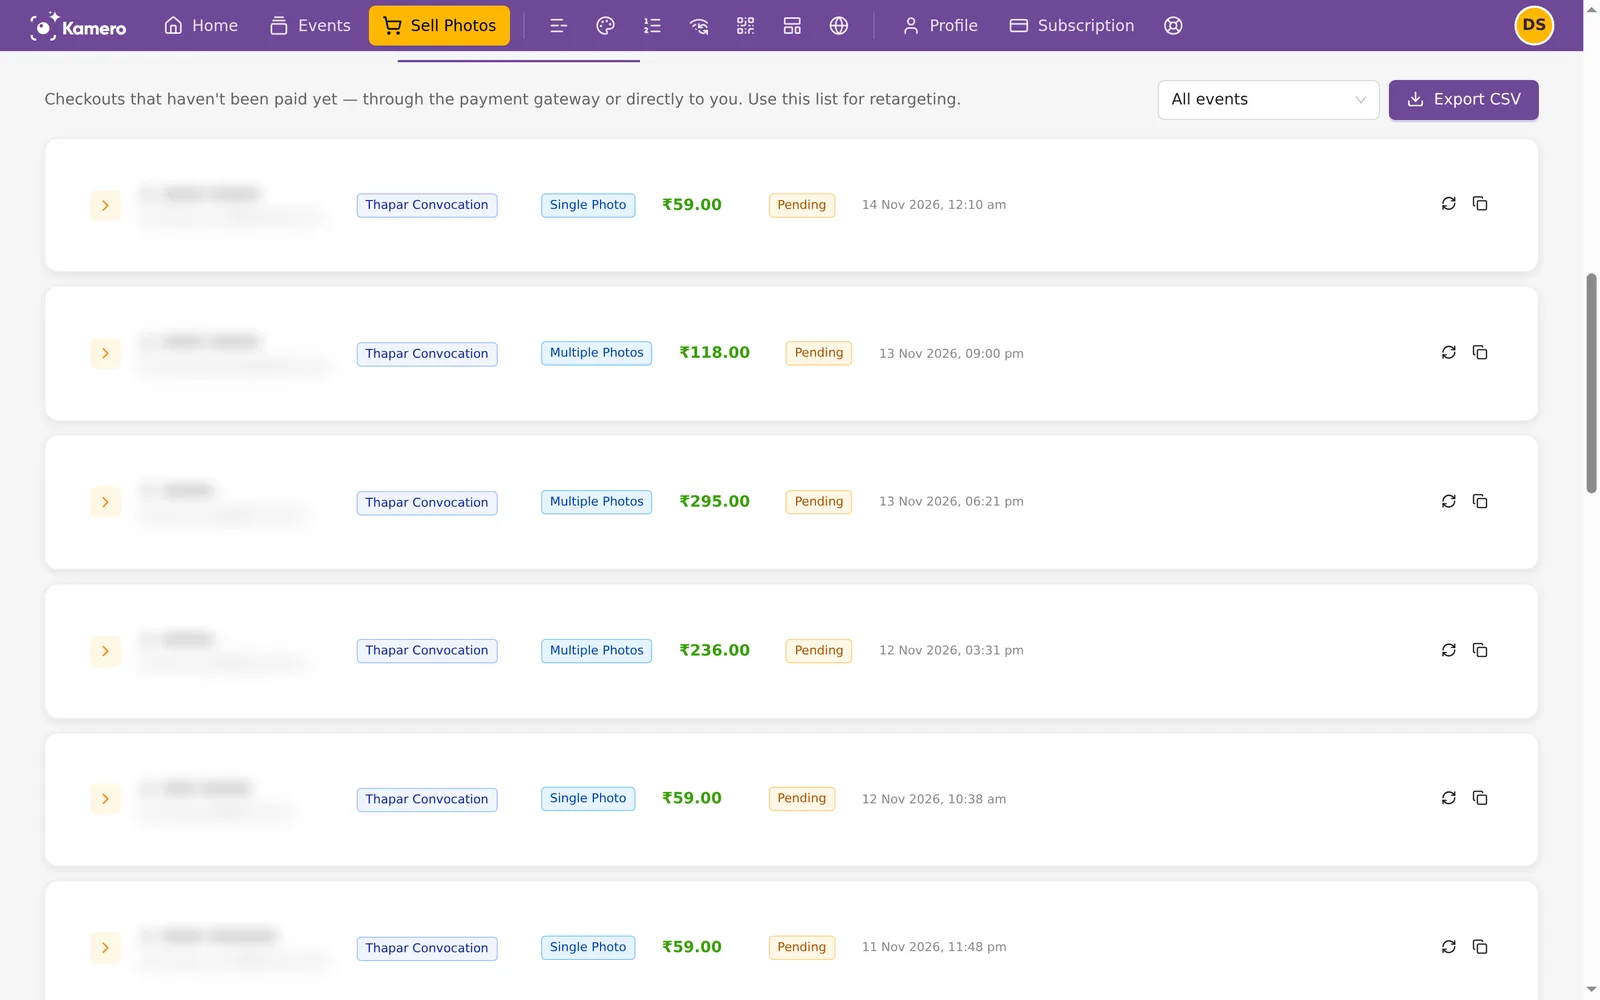
Checkouts that haven't been paid yet, through the payment gateway or directly to you. Use it to remind buyers who left before paying. Each row has a button to refresh the payment status and one to copy the buyer's email. Click Export CSV to download the list with each buyer's name, email and phone. Only buyers who signed in and pressed checkout appear here. Kamero also emails signed-in buyers about photos left in their cart, after about 24 and 72 hours. See Follow up with buyers who didn't finish paying.
Getting paid
- INR sales: each paid order adds its Seller Total to your INR Balance. Payouts are made by hand by the Kamero team, on request. Once your Business Settings are approved, contact support and ask for a payout to the bank account in Business Settings. There is no payout button and no fixed payout date. You get an email titled "Payment Settlement Processed" with the amount, and the payout shows as a Debit in the Wallet Ledger tab.
- Other currencies: the buyer pays you directly, so nothing waits in Kamero. You only pay for the Sell Photos Plan.
All photo sales are final, so completed orders can't be refunded through Kamero. If a payment fails but money was deducted, the payment provider returns it to the buyer, usually in 5 to 7 business days.
Your seller balance is separate from the credits you spend on Kamero orders. For those, see Wallet ledger.
Common problems
- The Sell Photos page asks you to add business details. Fill in Business Settings and save them. Buyers can pay once they are saved.
- New photos don't show yet. Kamero adds the watermark first. Wait a minute or two and click Refresh.
- Buyers can't find their photos with a selfie. Open event settings and click Refresh next to Refresh Face Recognition.
- A price won't save. Check that each bundle costs more than one photo, and that All Event Photos costs more than All My Photos.
- Still stuck? Open a ticket. See Support tickets.
Frequently asked questions
Do I need a Sell Photos Plan to sell in India?
No. Sales in INR go through Kamero and need no plan. The plan is only for sales in other currencies, where buyers pay you directly.
Can one event have prices in two currencies?
No. Each event has one currency, set in Sell Photos Pricing. Buyers see and pay in that currency only. To sell in another currency, create a separate event.
When do I get my money for INR sales?
Each paid order is added to the INR Balance on your Seller Dashboard. Payouts are made by hand: once Kamero has verified your Business Settings, contact support and ask for a payout to your bank account. There is no payout button and no fixed payout date. You get an email when a payout is made.
How do I change my bank or GST details after approval?
Once Kamero approves your Business Settings, the form is locked. Contact support and ask them to unlock it, then update your details.
Why can't a buyer check out?
A buyer who already has unpaid orders with you can't start a new one until those are paid or closed. For non-INR events, checkout also stops if your Sell Photos Plan is not active or all its orders for the year are used.
Can buyers get a refund?
No. All photo sales are final. If a payment fails but money was deducted, the payment provider returns it to the buyer, usually in 5 to 7 business days. For direct payments, any refund is between you and the buyer.
Do the watermarks stay on photos a buyer pays for?
No. The Standard Watermark is shown on photos in the gallery. Buyers download the original photo, without the watermark, after they pay.
Can buyers find their own photos?
Yes. Buyers take a selfie and see the photos they appear in. If you turn on the All My Photos bundle, they can buy all of those photos at one price.
More Plans, orders & billing tutorials
Try it in your dashboard
Sign in to Kamero and follow along. Questions? Raise a support ticket from the dashboard.